usethis::use_git()Intermediate guide to publish a Quarto website with GitHub & Netlify
R
Quarto
GitHub
Netlify
Learn how to publish a Quarto website, connect it to GitHub, & deploy it with Netlify using continuous integration.
Thankfully, many amazing resources for building beautiful websites and blogs with Quarto already exist. Instead of adding to that pool of content, I’ll demo how I built my website with Quarto, connected to a GitHub repository, and then deployed and published with Netlify continuous deployment. Special thanks to Libby Heeren for testing this demo and helping me clarify some sticky points! ♥️
I struggled for hours trying to set up the configurations so my site would deploy every time I pushed a change to my GitHub repo. Hopefully this demo saves you some time when you start your own website! :)
As with most tech and dev stuff, there’s many ways to do (almost) the same thing. I’d love to hear how other people have their Quarto/Netlify workflows set up. Leave a comment at the end of the post, or reach out!
Anyhoo, keep on reading to learn about:
- options for publishing a Quarto website
- creating a Quarto website as an RStudio project
- connecting this project to a GitHub repository
- initially publishing to Netlify using the Quarto command line interface (CLI)
- setting up the configuration files for continuous deployment
- using Netlify’s branch deploys and deploy previews
- installing the Lighthouse plugin to audit your site’s performance, accessibility, best practices, and search engine optimization (SEO) at build time
Why Netlify?
There are lots of options for publishing Quarto websites:
- GitHub Pages
- Quarto Pub
- Posit Connect
- Confluence
- Firebase
- Site44
- Amazon S3
- And of course, Netlify
Honestly, I was completely overwhelmed by all the options. I had to think about what was most important to me:
- using my own custom domain
- continuous integration so I could deploy from version control
- easy configuration and maintenance
I checked out what other #RStats bloggers1 were using and found many folks used GitHub Pages or Netlify.
After some repo-diving and research, I decided to go with Netlify and their starter plan, shown below:
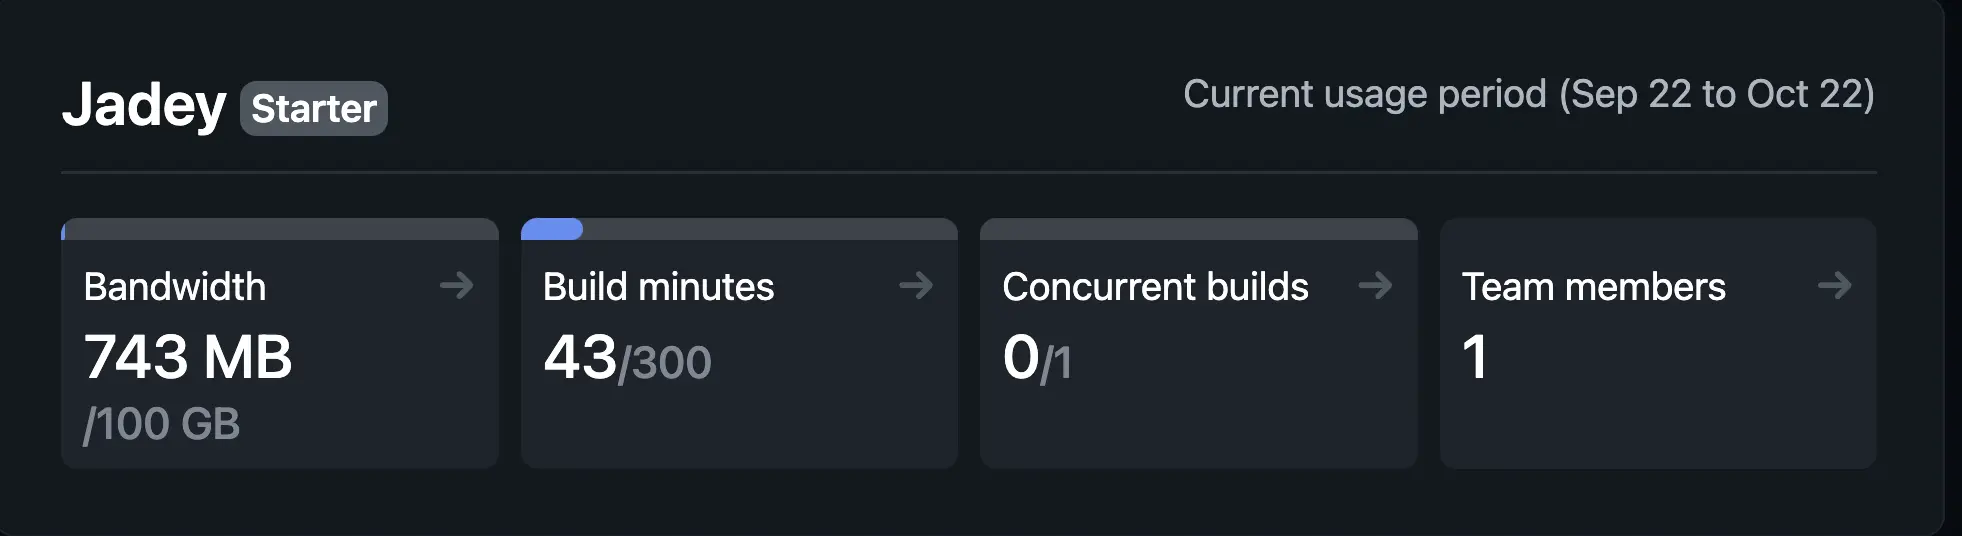
I don’t think I’ll ever get near the Netlify starter plan limits, but who knows. If I exceed the limits, I pay as I go. Or, I can upgrade to $19/month for much higher limits.
A major selling point for Netlify is the free deployment preview system. We can use branch deploys to preview changes from a feature branch or deploy previews to see changes from pull requests and merges. These deployment previews don’t touch our site in production.
NoteDifferences between deploy and publish
I was confused about the terminology of deploying and publishing a website. While they seem interchangeable, there are some subtle differences.
Deploys push files to Netlify’s server and build the site. We can have multiple deploys with their own unique URLs that we use to preview changes. These represent our site at specific points in time and are useful for testing or staging.
Publishing makes the deployed site publicly available at our main URL. This published site is what I’ll call our site in production, meaning it’s live and accessible to users.
A similar feature is under development for GitHub Pages, according to this discussion on GitHub Community.
Jump to the Branch deploys and deploy previews section for more details on the deployment preview system.
ImportantImportant Note about Continuous Integration (CI)
Netlify servers can render markdown and build the website2, but cannot execute code3. This means all code must be executed locally on our computer and the output must be saved via the Quarto freeze feature AND committed to our repo.4
To learn more about rendering Quarto documents and websites with CI, read this article. The article discusses a continuum that extends from running everything locally to running everything remotely on a CI server. The workflow presented in this post sits in the middle:

The complete walk-through
If you’re still interested in creating a website with Quarto and publishing with Netlify, follow along to get started!
1 Create a Quarto website
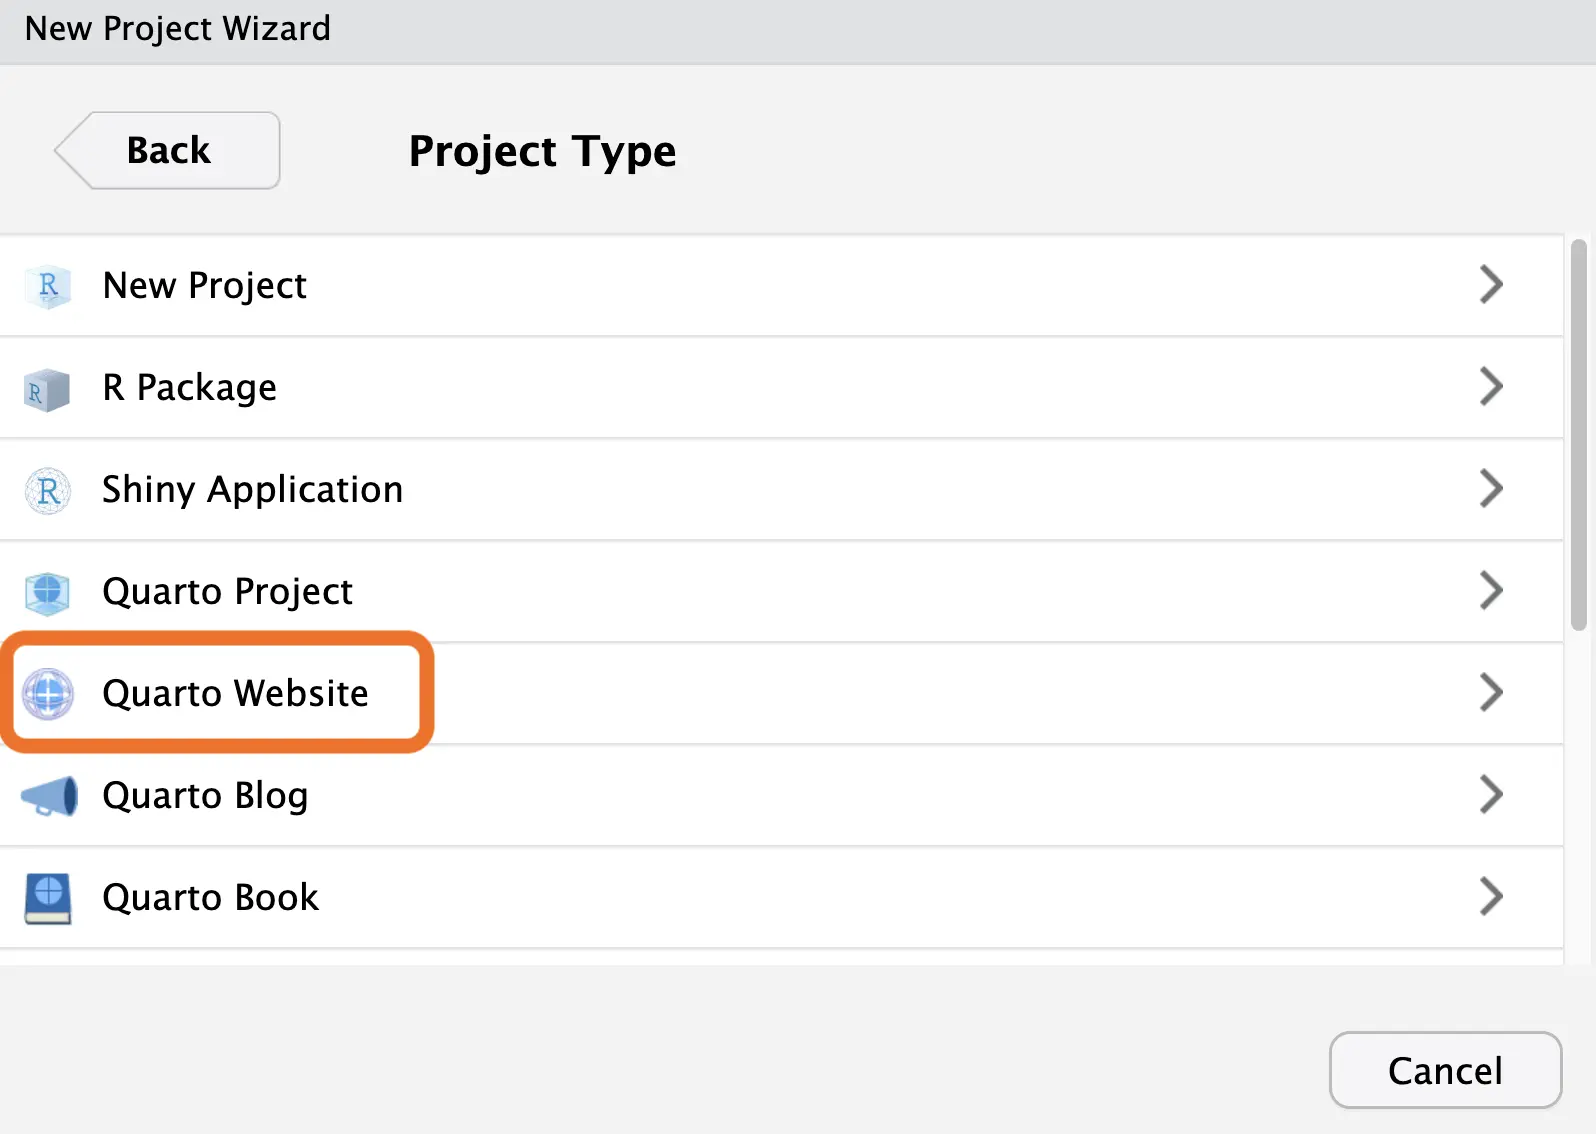
In RStudio, go to File > New Project > New Directory to open the New Project Wizard.
Let’s start with a website. If you’d like to add a blog later on, Samantha Csik wrote a great blog post explaining this process (Csik 2022).
WarningAre you new to GitHub?
I’m assuming you already use GitHub and connected it to RStudio. If you haven’t, please follow the installation instructions in Happy Git and GitHub for the useR (Bryan and Hester 2023) and then come back.
Choose the name of our directory (which will also be the name of our GitHub repository), check the Create a git repository box, then click Create Project.
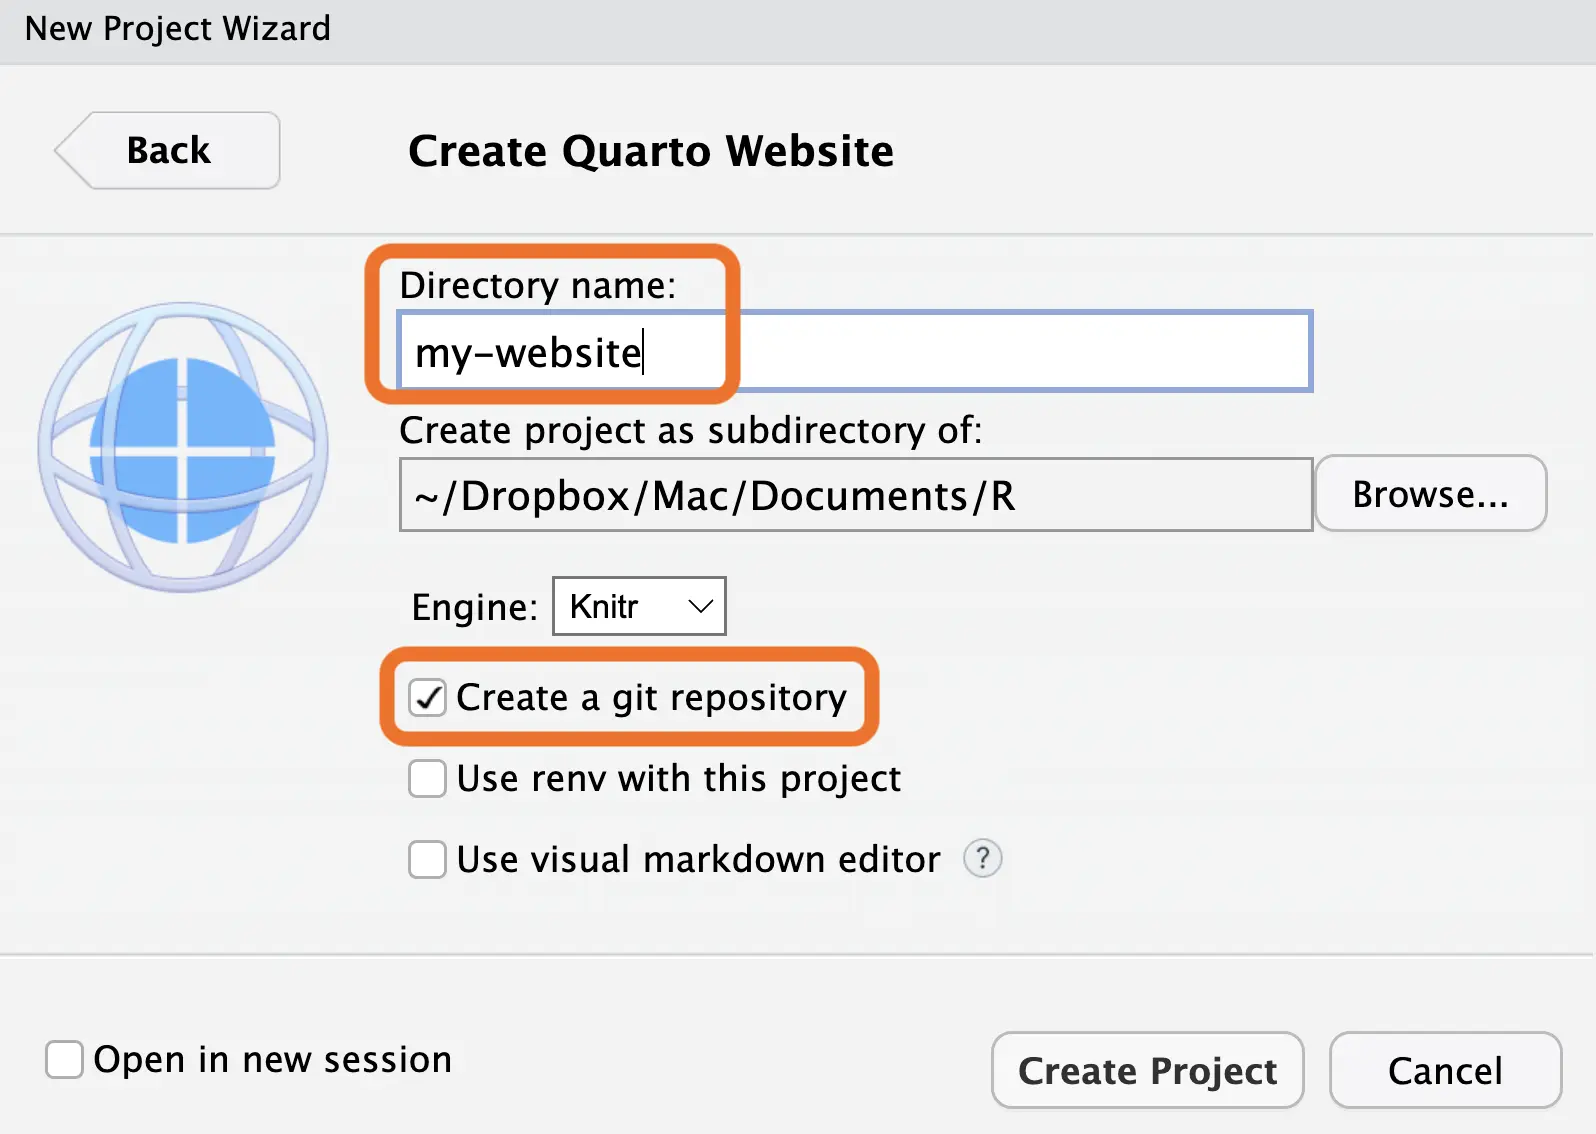
We should now be in a RStudio project that has index.qmd and _quarto.yml open and some new things in our Files pane:
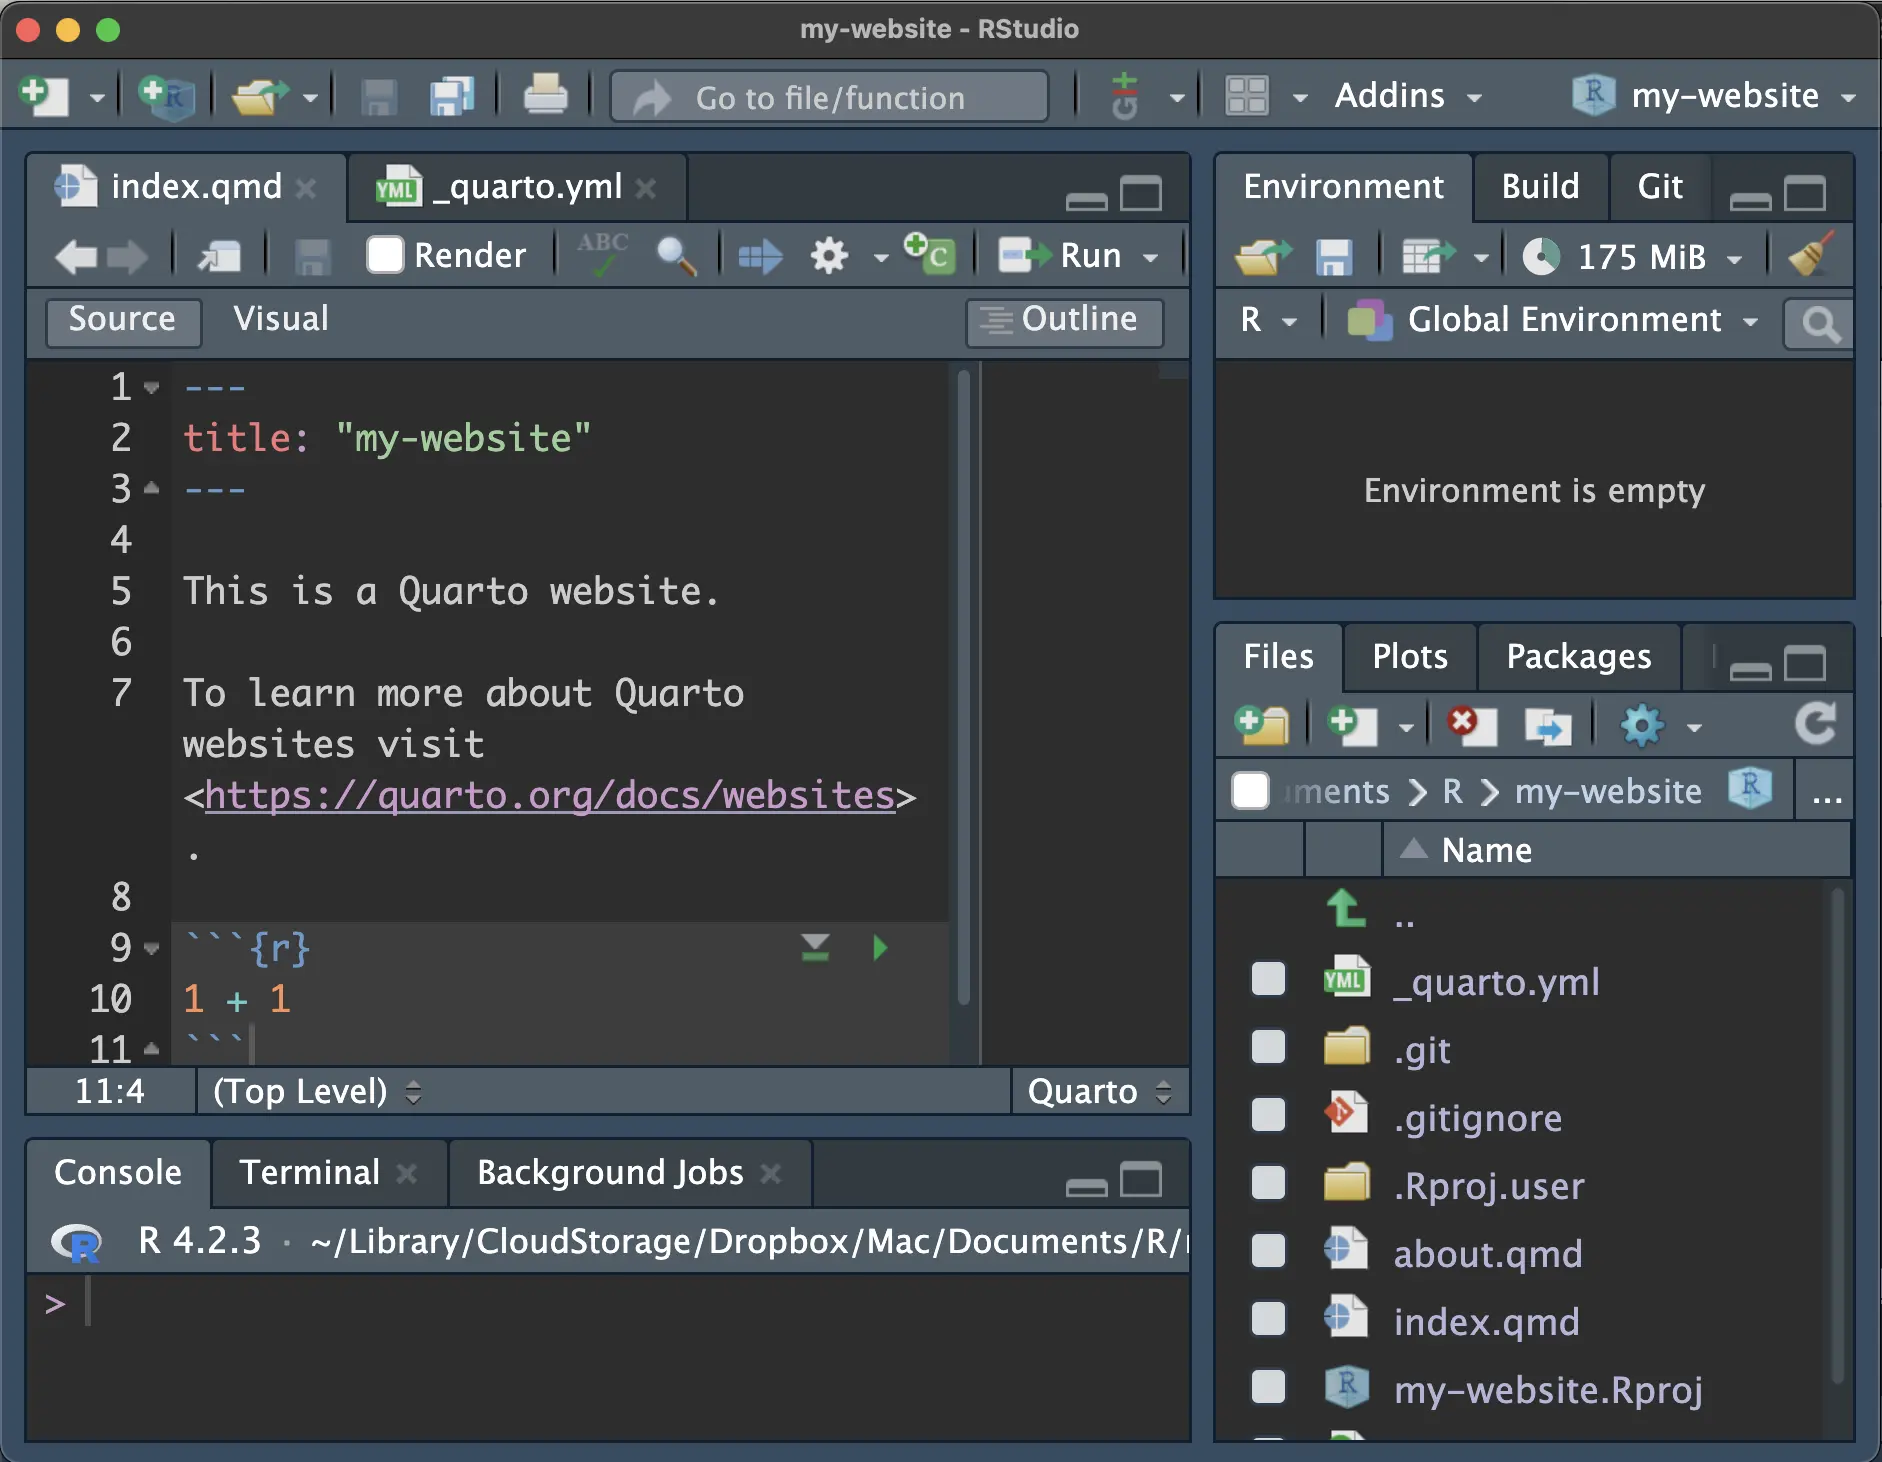
Our Files pane should have the following:
├── _quarto.yml # Website configuration file
├── about.qmd # About page
├── index.qmd # Landing page
├── my-website.Rproj # RStudio project config file
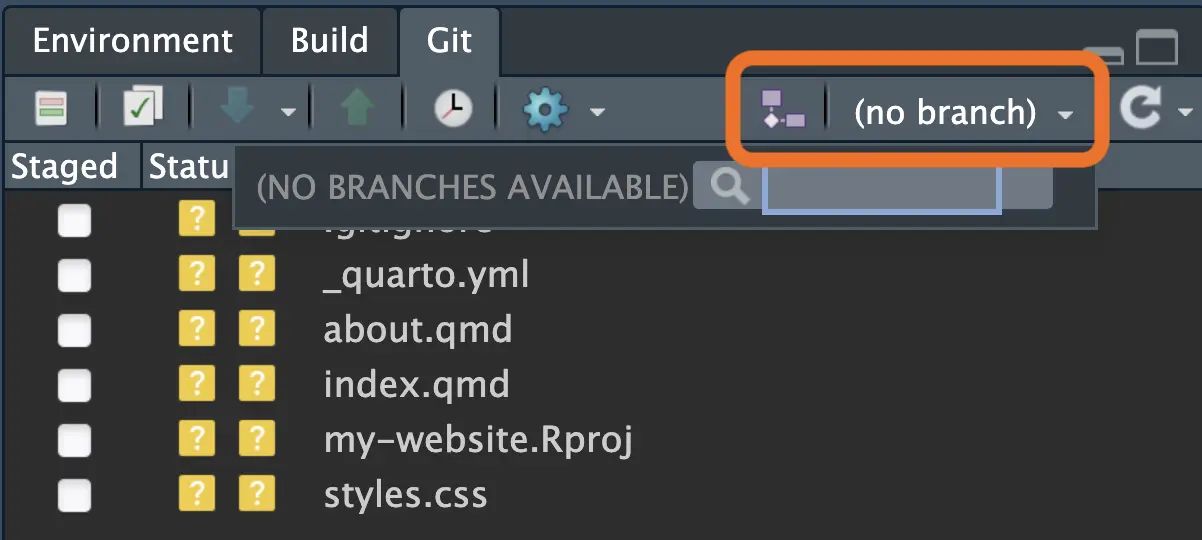
└── styles.css # CSS file for any custom stylingNotice we also have a Git pane with all of these files unstaged and no branches available. This is because we haven’t created a repository on GitHub and connected it with this project yet.
2 Create and connect to GitHub
If you’re following along with Happy Git and GitHub for the useR (Bryan and Hester 2023), we’re using the Existing project, GitHub last workflow.
Thankfully, we can use the usethis package so we don’t have to touch the terminal (yet)! If you haven’t used usethis yet, you’ll need to do the setup described in the package documentation.
Assuming we’ve connected and authenticated our GitHub account in RStudio, we use just two lines of code to create and connect a repository️ to our project 🧙🏼♀️.
# ✔ Setting active project to '/Users/jadeyryan/Library/CloudStorage/Dropbox/Mac/Documents/my-website'
# ✔ Adding '.Rhistory', '.Rdata', '.httr-oauth', '.DS_Store', '.quarto' to '.gitignore'
# There are 6 uncommitted files:
# * '_quarto.yml'
# * '.gitignore'
# * 'about.qmd'
# * 'index.qmd'
# * 'my-website.Rproj'
# * 'styles.css'
# Is it ok to commit them?
#
# 1: Negative
# 2: Nope
# 3: Yeah
#
# Selection: 3
# ✔ Adding files
# ✔ Making a commit with message 'Initial commit'usethis::use_github()# ℹ Defaulting to 'https' Git protocol
# ✔ Creating GitHub repository 'jadeynryan/my-website'
# ✔ Setting remote 'origin' to 'https://github.com/jadeynryan/my-website.git'
# ✔ Pushing 'main' branch to GitHub and setting 'origin/main' as upstream branch
# ✔ Opening URL 'https://github.com/jadeynryan/my-website'Our new GitHub repository should open in our browser.
3 Connect and publish to Netlify
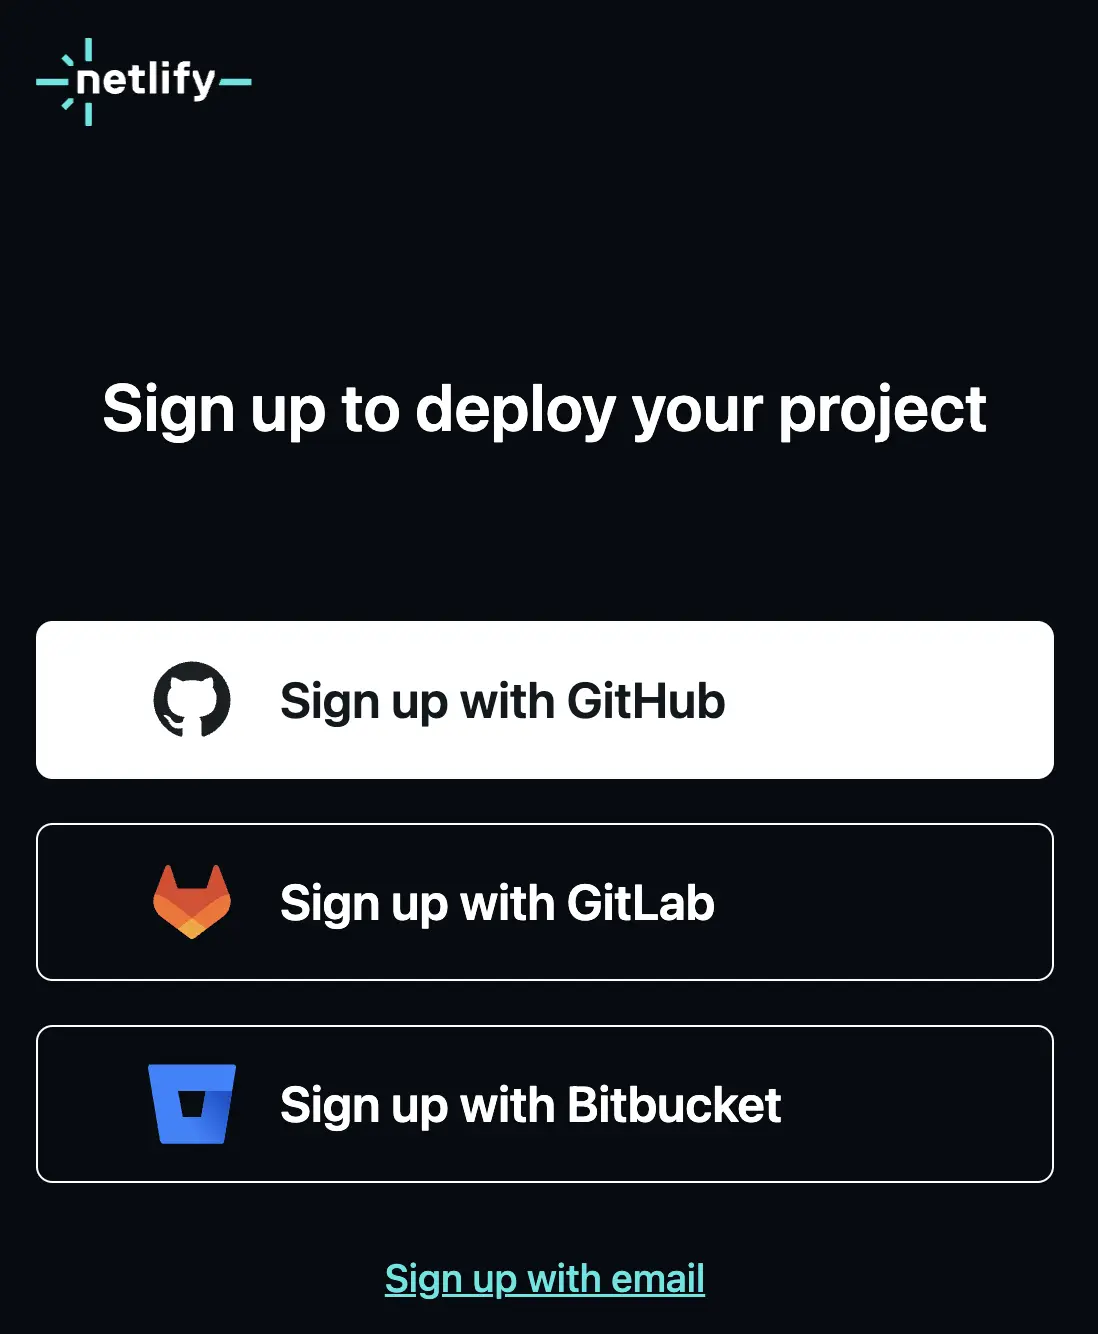
In order to use Netlify’s continuous deployment, we need to connect our Git provider to our Netlify account. If you don’t have a Netlify account yet, you can sign up with GitHub.
Once we’re logged into Netlify and connected to our GitHub, we can do the initial publishing with the Quarto CLI. In the terminal, run:
Terminal
quarto publish netlifyIf you’re not already logged in to Netlify on your browser, there may be an additional authentication step.

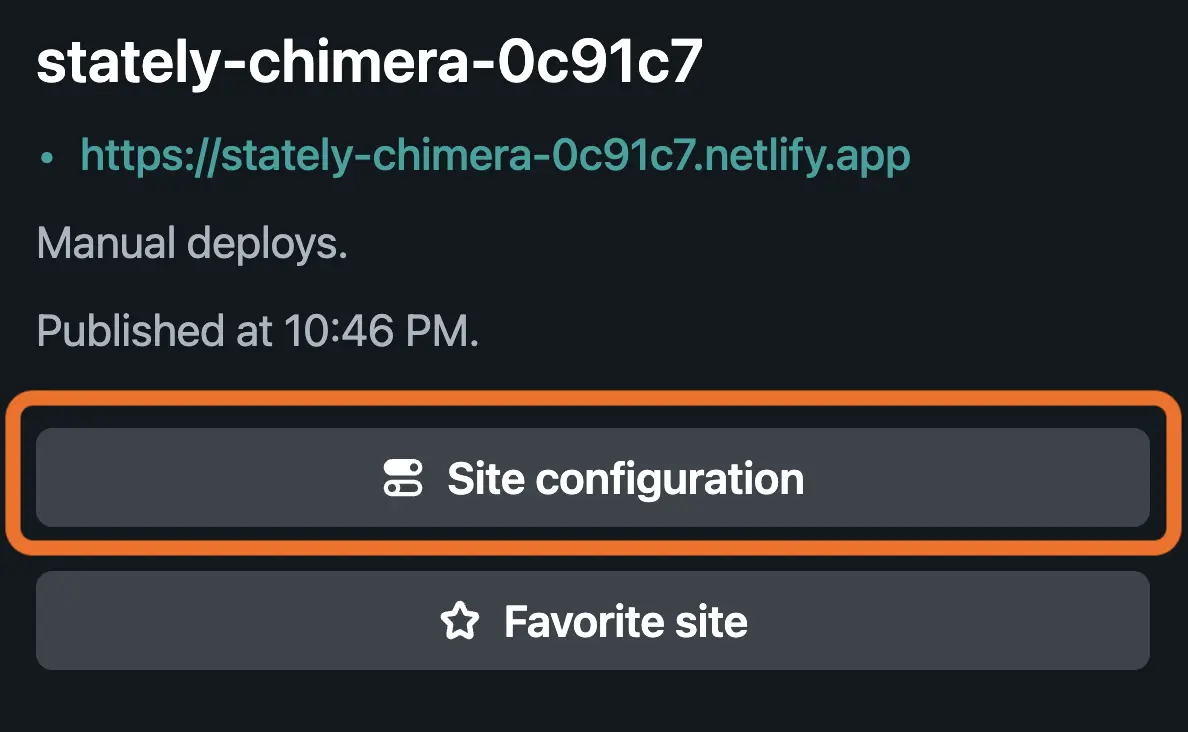
This command rendered our site locally, uploaded all the static files to Netlify, and then deployed and published our new site! The site overview on Netlify should have opened in our browser:
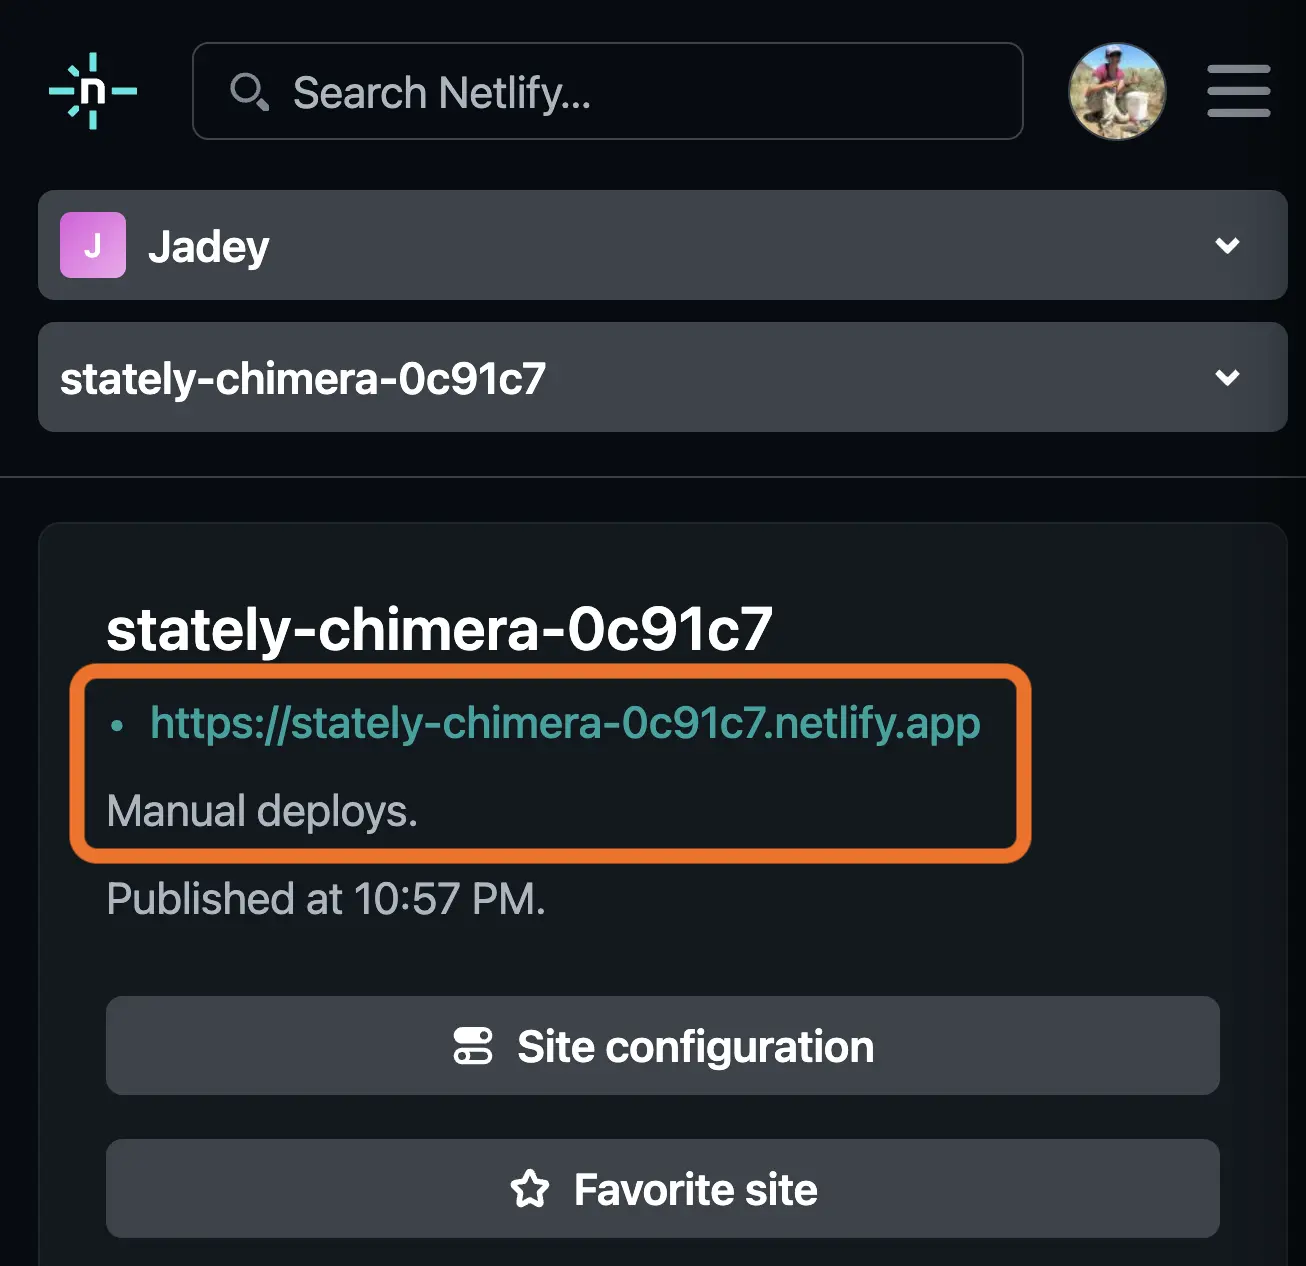
Netlify provided a random site name (stately-chimera-0c91c7) on the netlify.app domain. Also, notice that it says Manual deploys underneath the site link, meaning it was deployed from the quarto publish netlify command in our terminal and not from GitHub.
Click on that link to open our live site!

3.1 Site domain name
The domain name is the URL or web address to our site. We have two options to rename our site:
- Free: change the random name provided but keep the
netlify.appdomain. - Purchase a new domain: I recommend buying it directly on Netlify so they handle all the DNS configurations. Or, buy from a domain provider that doesn’t use the NS1 DNS zone, or you might go through the nightmare of switching DNS zones.5
Free domain name change
Let’s walk through the free option first.
From the site overview Netlify page, click on Site configuration.
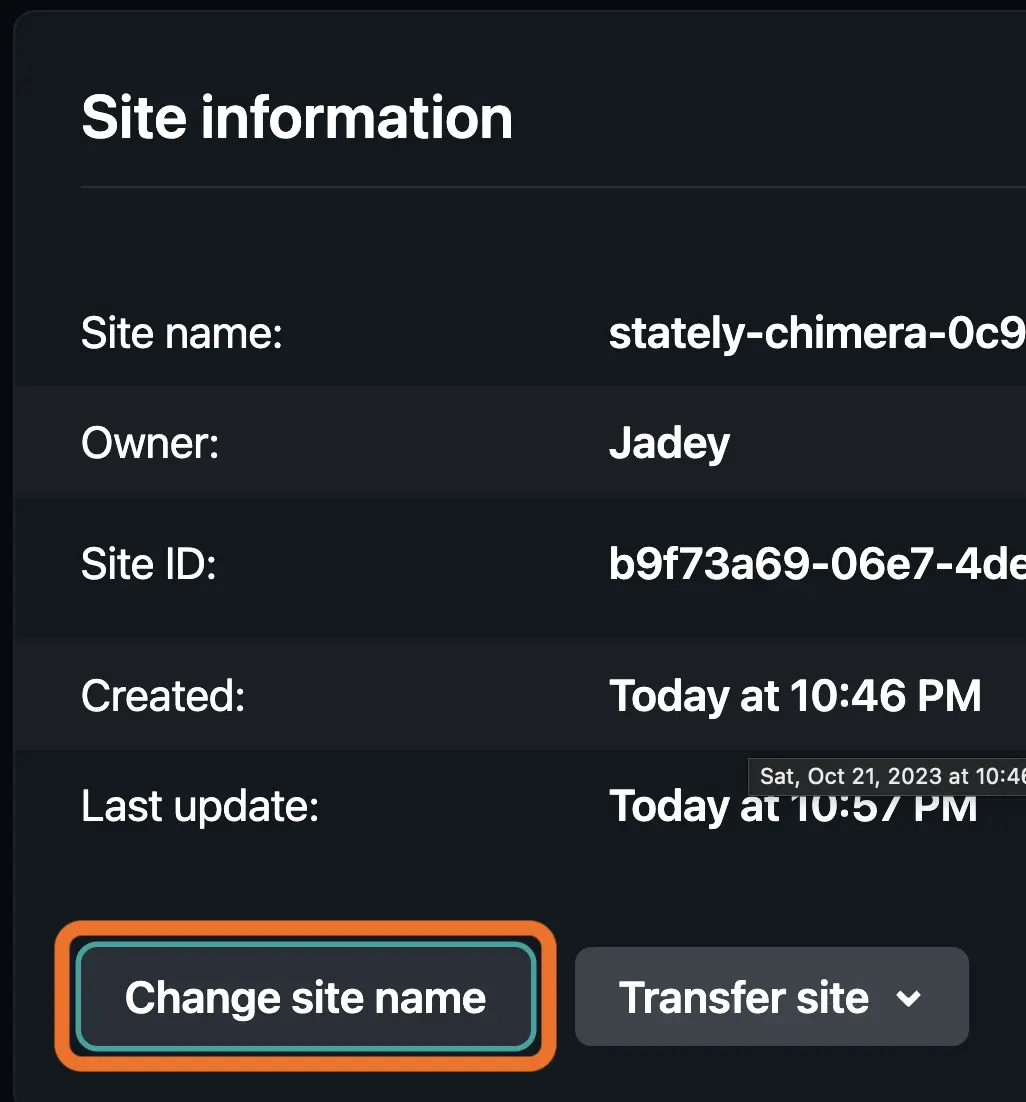
Scroll down to Site information, and then click on Change site name.
Now we can update the site name and click Save:
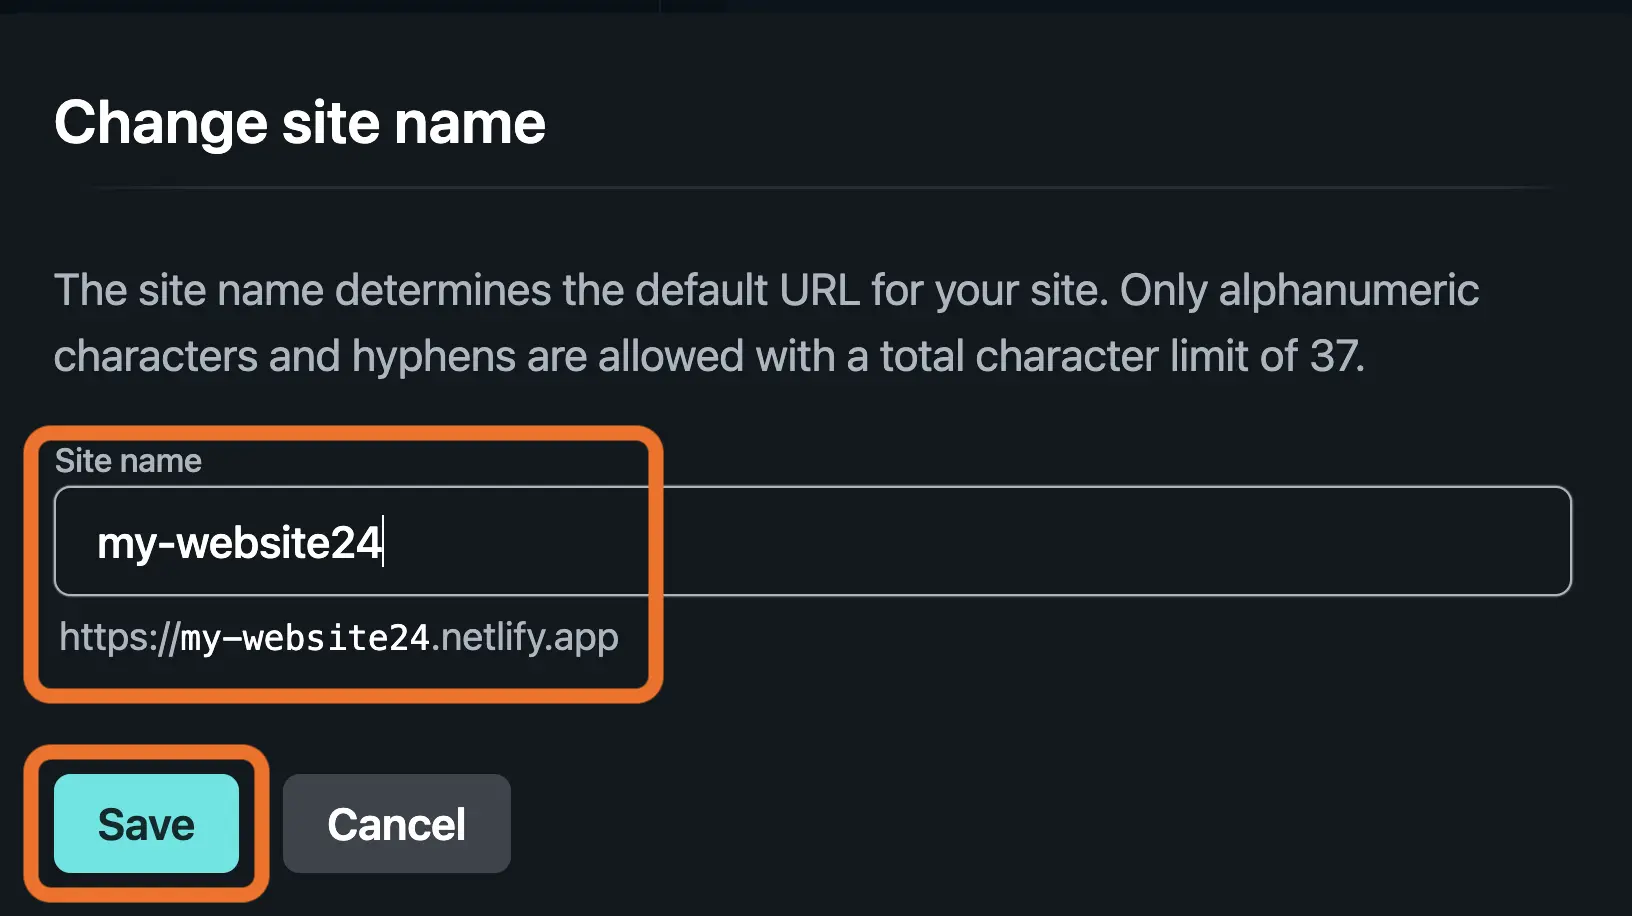
Note our site name is just the prefix to the full URL containing netlify.app.
Buy a domain name
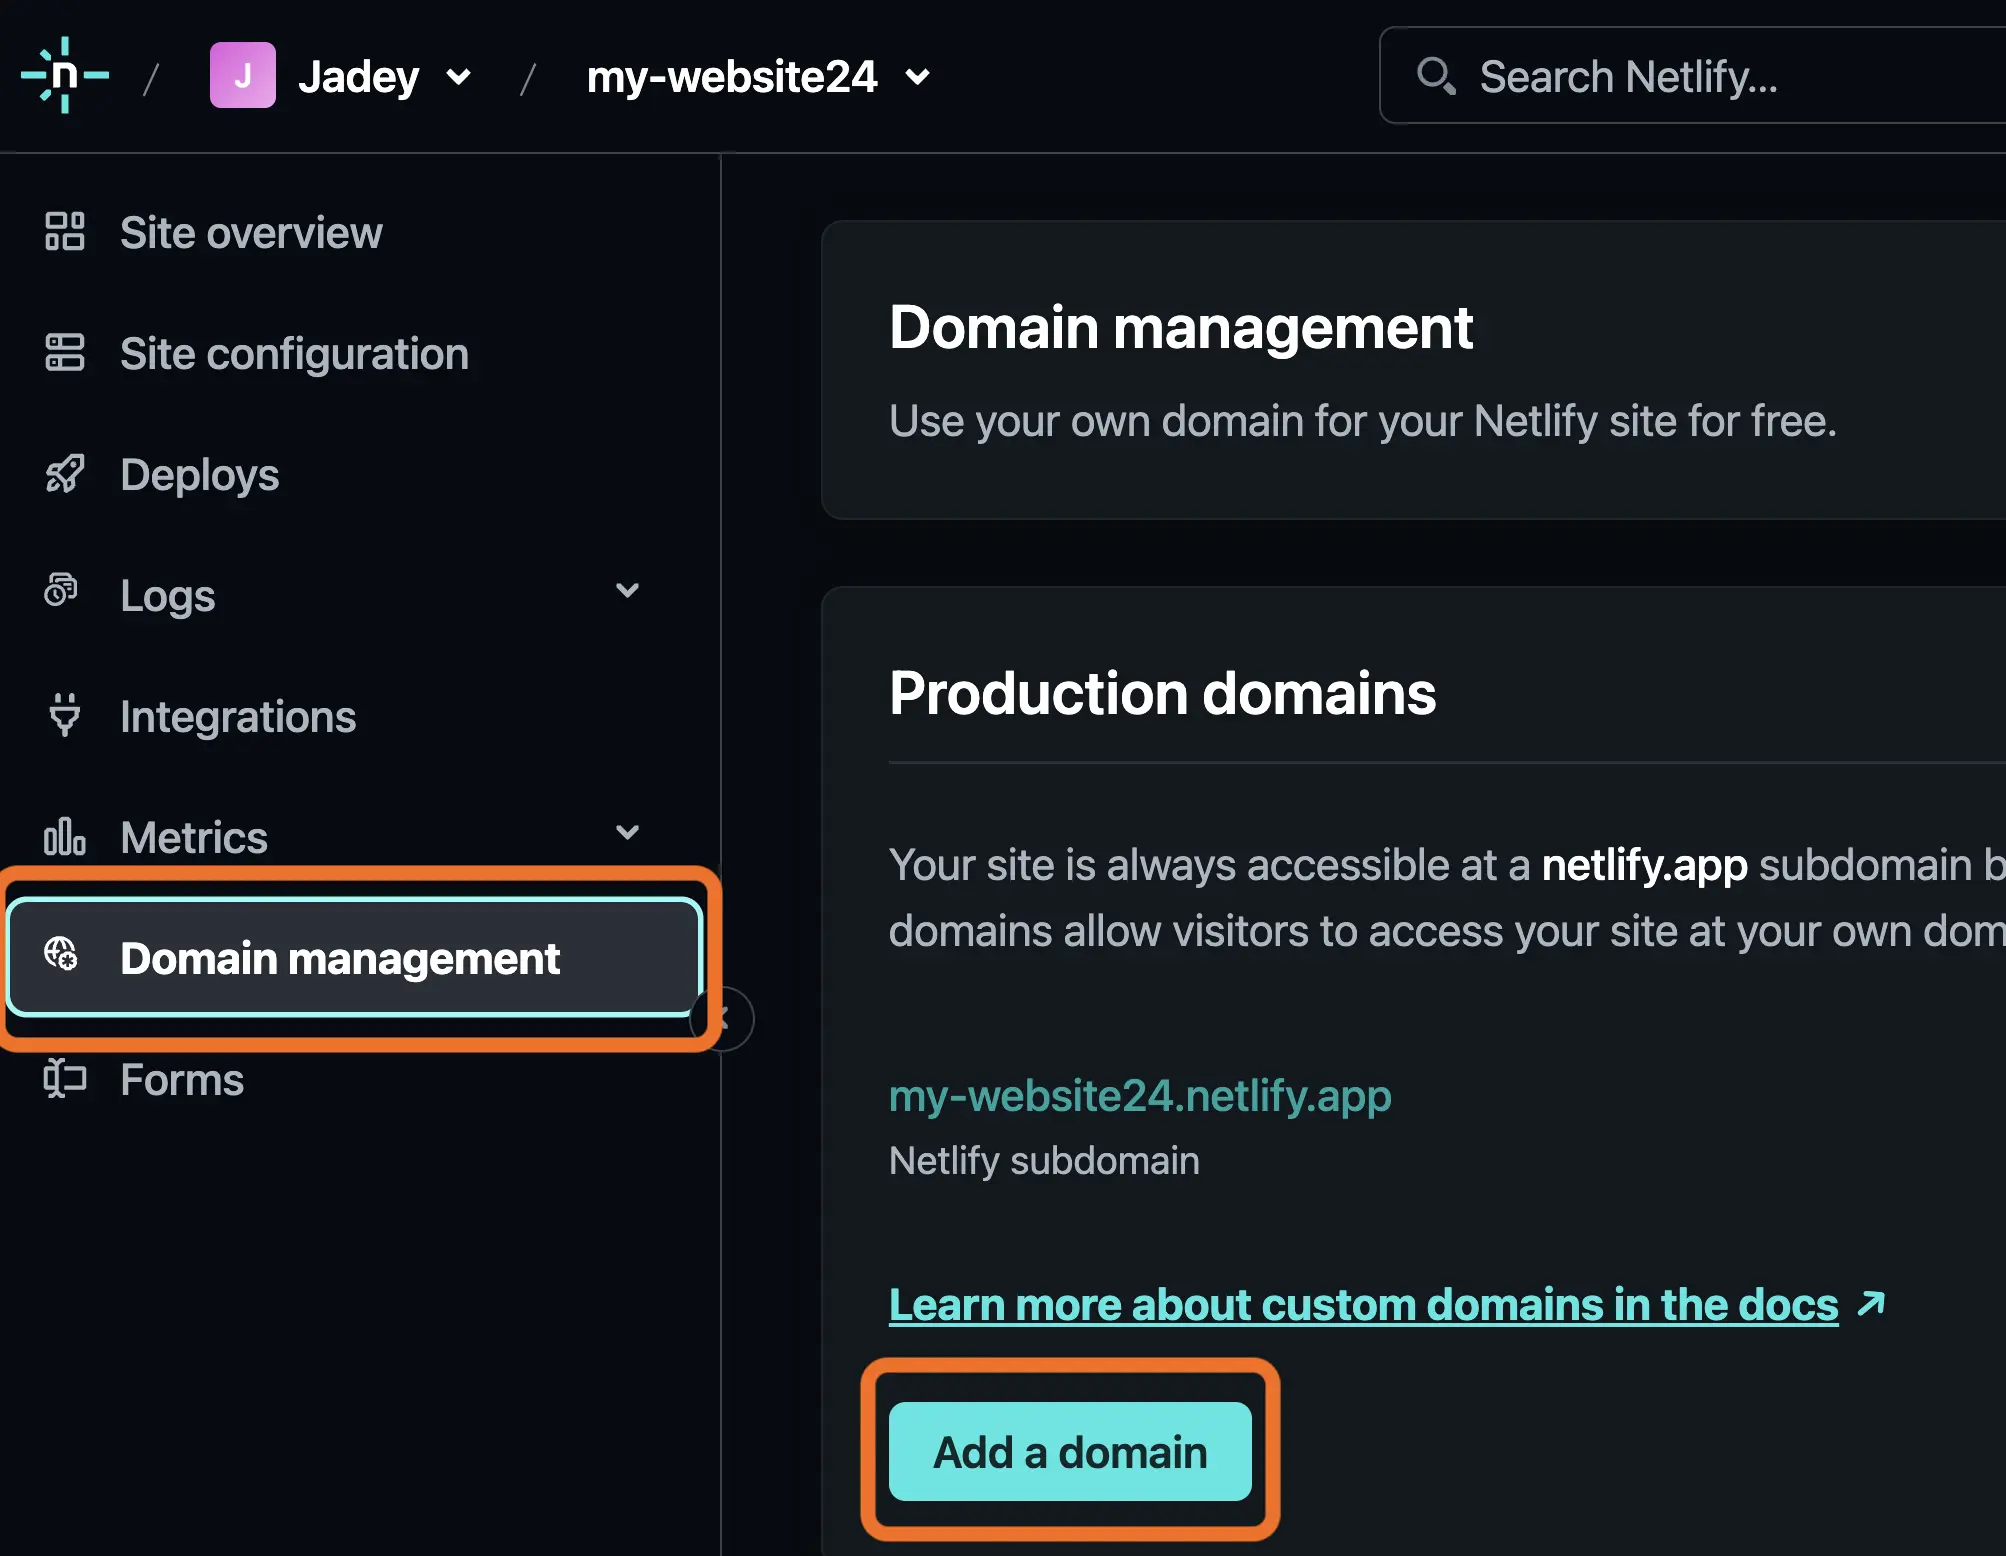
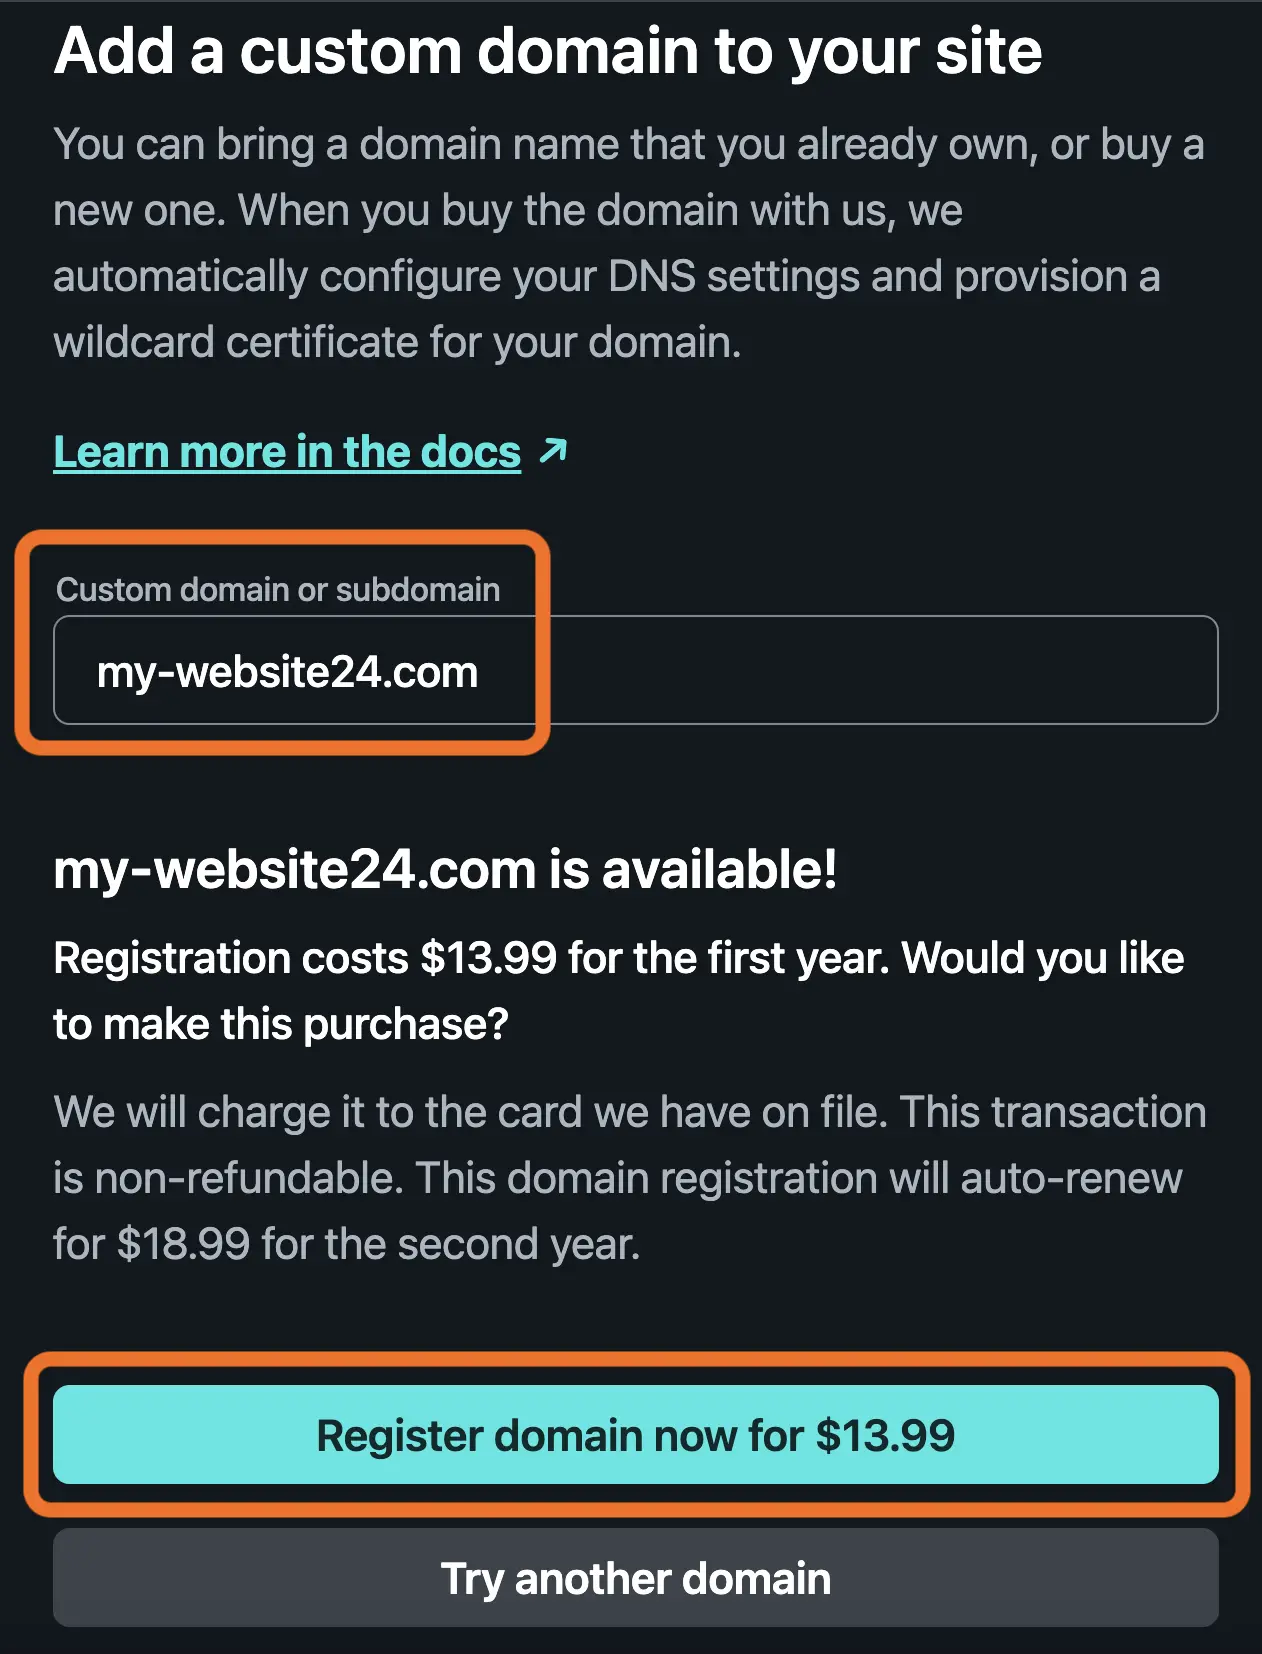
If you don’t want the netlify.app domain, you can purchase your own. Instead of Site configuration, go to Domain management, and then click Add a domain.
Type in whatever custom domain we want. There are a bajillion different extensions – domain.com lists them alphabetically and has a helpful FAQ about domain extensions. my-website24.com is available for $13.99 for the first year.
3.2 New _publish.yml file
Now that we’re set up with Netlify and GitHub, let’s head back to RStudio. Notice this new file _publish.yml appeared in the project directory when we used the quarto publish netlify command:
_publish.yml
- source: project
  netlify:
    - id: b9f73a69-06e7-4de2-9c7b-4f9855b56ba3
      url: 'https://stately-chimera-0c91c7.netlify.app'
The Netlify site ID and original random URL were automatically filled in.
The next time we manually publish from the terminal, it will ask if we want to publish the update to https://my-website24.netlify.app. If we enter y, it will update the url value in the _publish.yml file.
Terminal
(base) MacBook-Pro-4:my-website jadeyryan$ quarto publish netlify
? Publish update to: › https://stately-chimera-0c91c7.netlify.app (Netlify - jadey.nicole.ryan@gmail.com)
Rendering for publish:

[1/2] index.qmd
[2/2] about.qmd

[✓] Preparing to publish site
[✓] Uploading files (complete)
[✓] Deploying published site
[✓] Published site: https://stately-chimera-0c91c7.netlify.app

(base) MacBook-Pro-4:my-website jadeyryan$ quarto publish netlify
? Publish update to: › https://my-website24.netlify.app (Netlify - jadey.nicole.ryan@gmail.com)
Rendering for publish:

[1/2] index.qmd
[2/2] about.qmd

[✓] Preparing to publish site
[✓] Uploading files (complete)
[✓] Deploying published site
[✓] Published site: https://my-website24.netlify.app
Important
If you continue to the next steps for configuring continuous deployment, this should be your last time manually publishing your site with quarto publish netlify in the terminal.
When adding code content, you should still run quarto render in the terminal to update the _freeze directory. Though, it’s good practice to always render before pushing to GitHub.
4 Configure continuous deployment
Now we need to configure several things so Netlify can automatically deploy and publish our site:
- Add Quarto Netlify plugin files
- Freeze code output by setting
freeze: autoin_quarto.yml - Ignore output directory by adding the
_sitedirectory to.gitignore - Link Netlify site to GitHub repository6
4.1 Configure Netlify plugin
The Quarto Netlify plugin installs Quarto on the Netlify build server, allowing Netlify to build our Quarto website.
Let’s create the netlify.toml and package.json files in our RStudio project and copy/paste the below content into these files.
netlify.toml
[[plugins]]
package = "@quarto/netlify-plugin-quarto"
package.json
{
  "dependencies": {
    "@quarto/netlify-plugin-quarto": "^0.0.5"
  }
}
4.2 Freeze computations
We need to freeze computations so code only runs locally. When we render a .qmd that executes code on our local machine, the results get saved in a html.json file within the _freeze directory. This means that the CI server has access to the code output and doesn’t need to execute any of the code.
The _freeze directory and all its files must be committed to our repo. Otherwise, the build will fail because Netlify doesn’t have the code output and can’t execute code without R installed. See the detailed error in my comment on a GitHub issue.
To automatically freeze all computations, add these two lines to our _quarto.yml file:
_quarto.yml
execute:
  freeze: auto
Setting freeze: auto tells Quarto to only re-render code when the source changes.
If you need to execute code within a CI service, see the Quarto docs for example GitHub Actions that install Quarto, R, and all dependencies.
4.3 Ignore output directory
Because we want Netlify bots to use continuous deployment to build our site, we need to ignore our output directory. To do this, we add the _site directory that contains all the rendered website content to our .gitignore file. This is recommended in the Quarto docs to avoid super messy diffs and potential merge conflicts.
.gitignore
/_site/
Note
If you’re not following the workflow in this blog post and instead are using the Local Execution & Rendering option of the CI continuum described in the Quarto docs, do not add _site to your .gitignore. You need this directory checked into version control so Netlify can access this content to publish your website.
4.4 Link Netlify site to GitHub repository
We already connected our Netlify and GitHub accounts, but now we need to tell Netlify which GitHub repo provides the source code for our website.
On Netlify, go to Site configuration > Build & deploy > Continous deployment > Link repository.
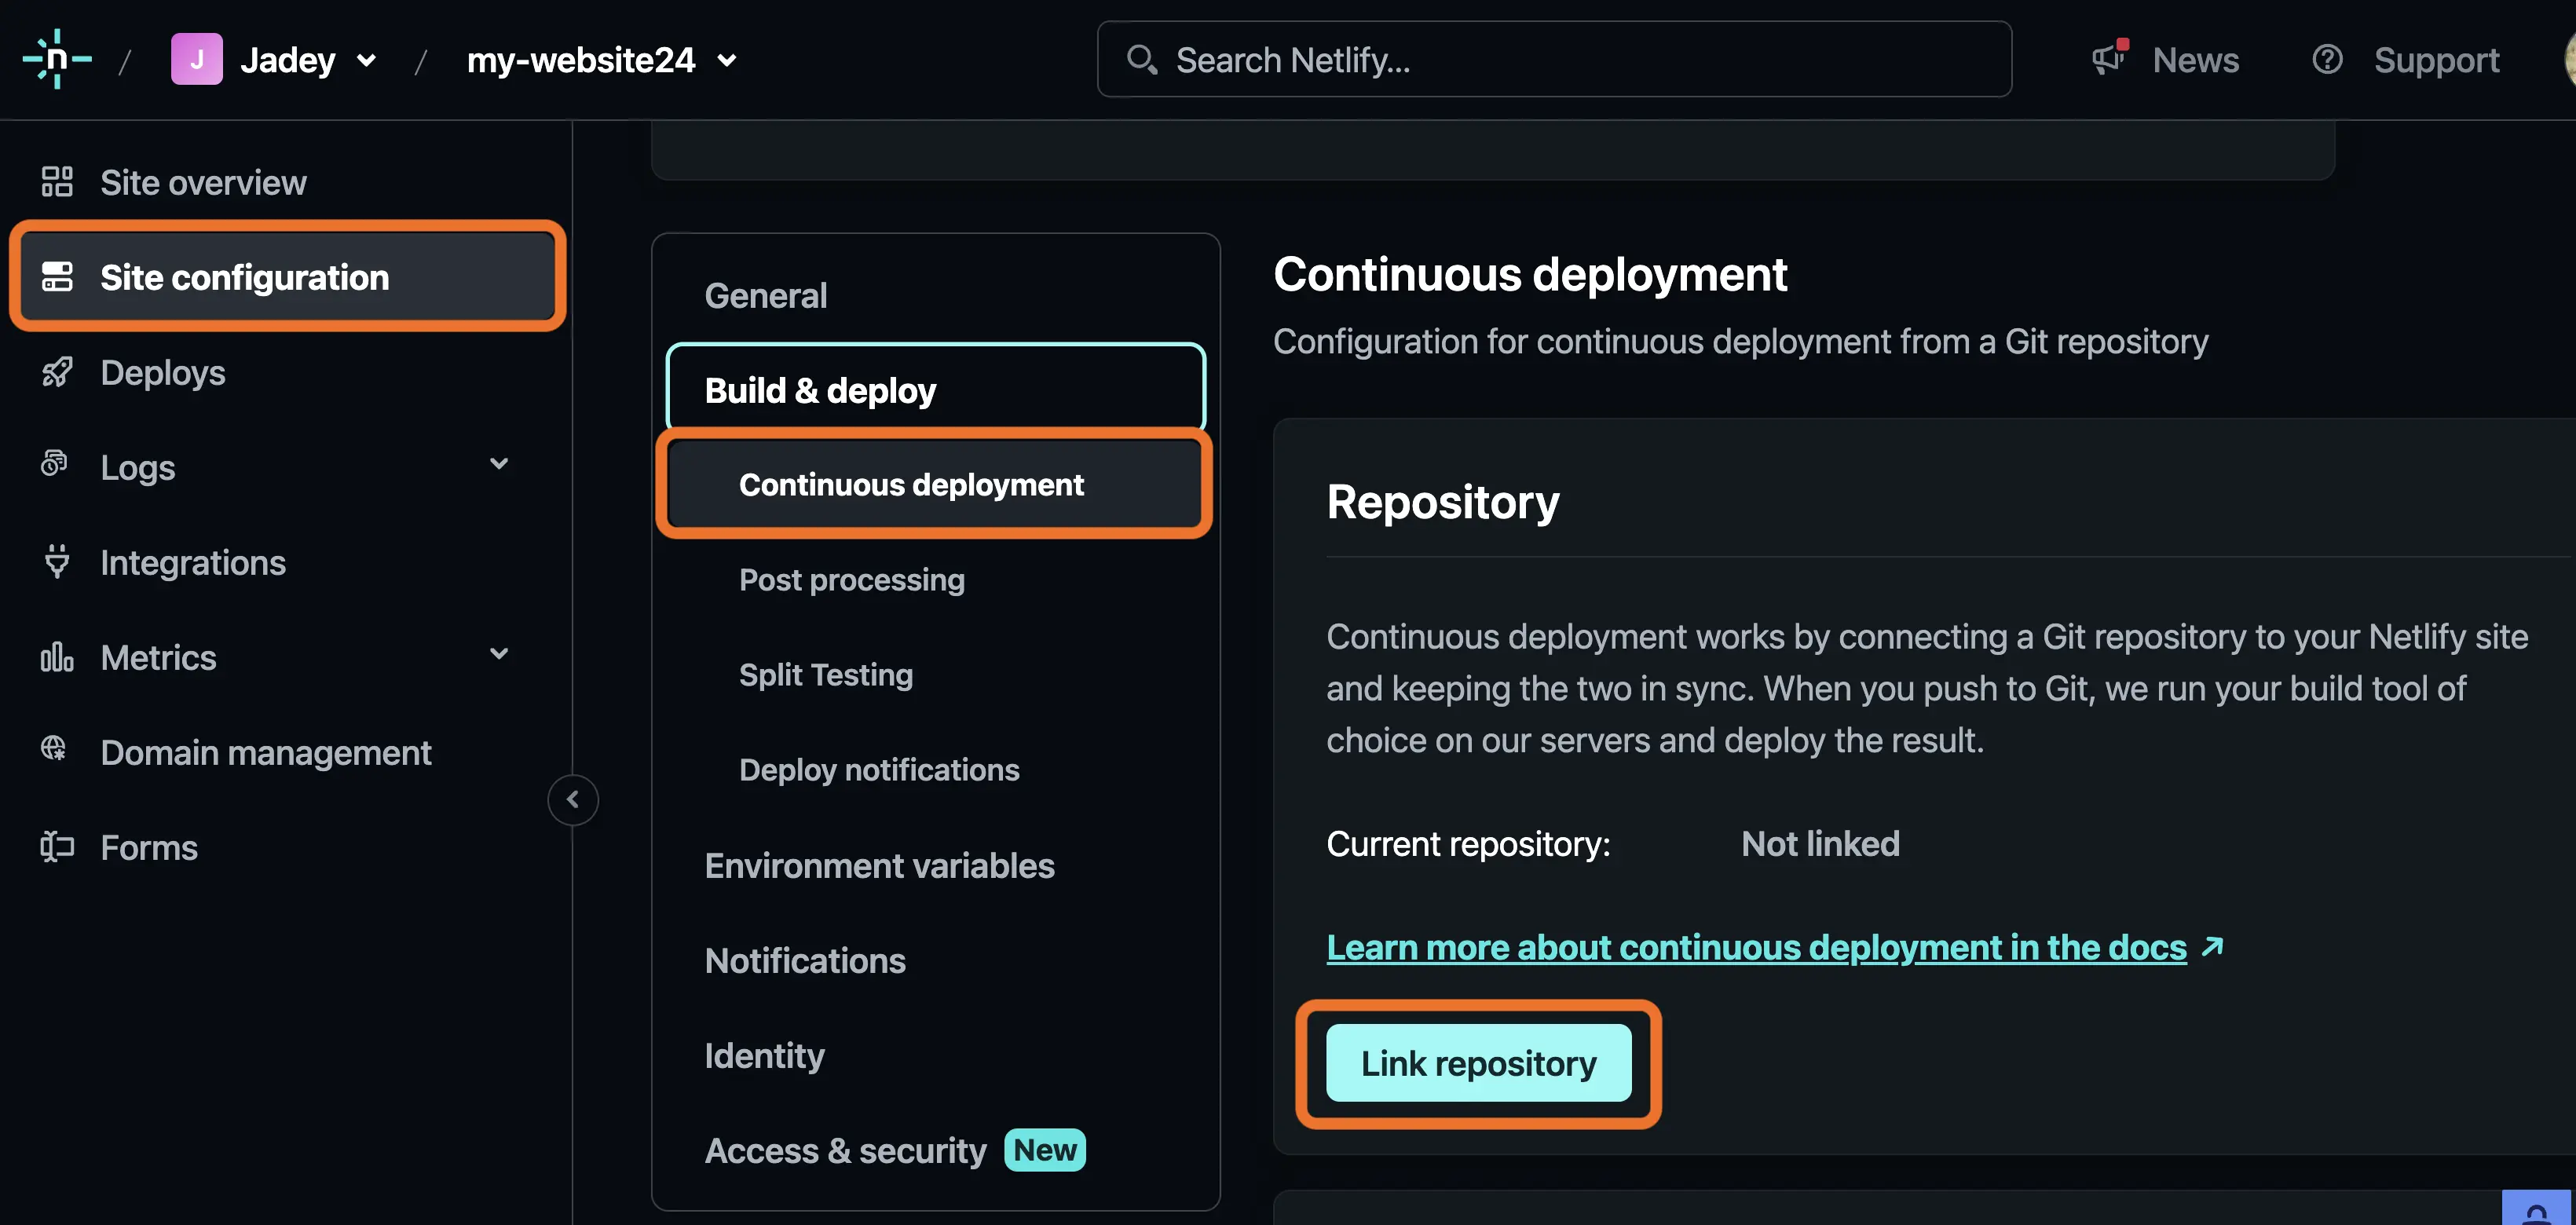
Choose Deploy with GitHub:
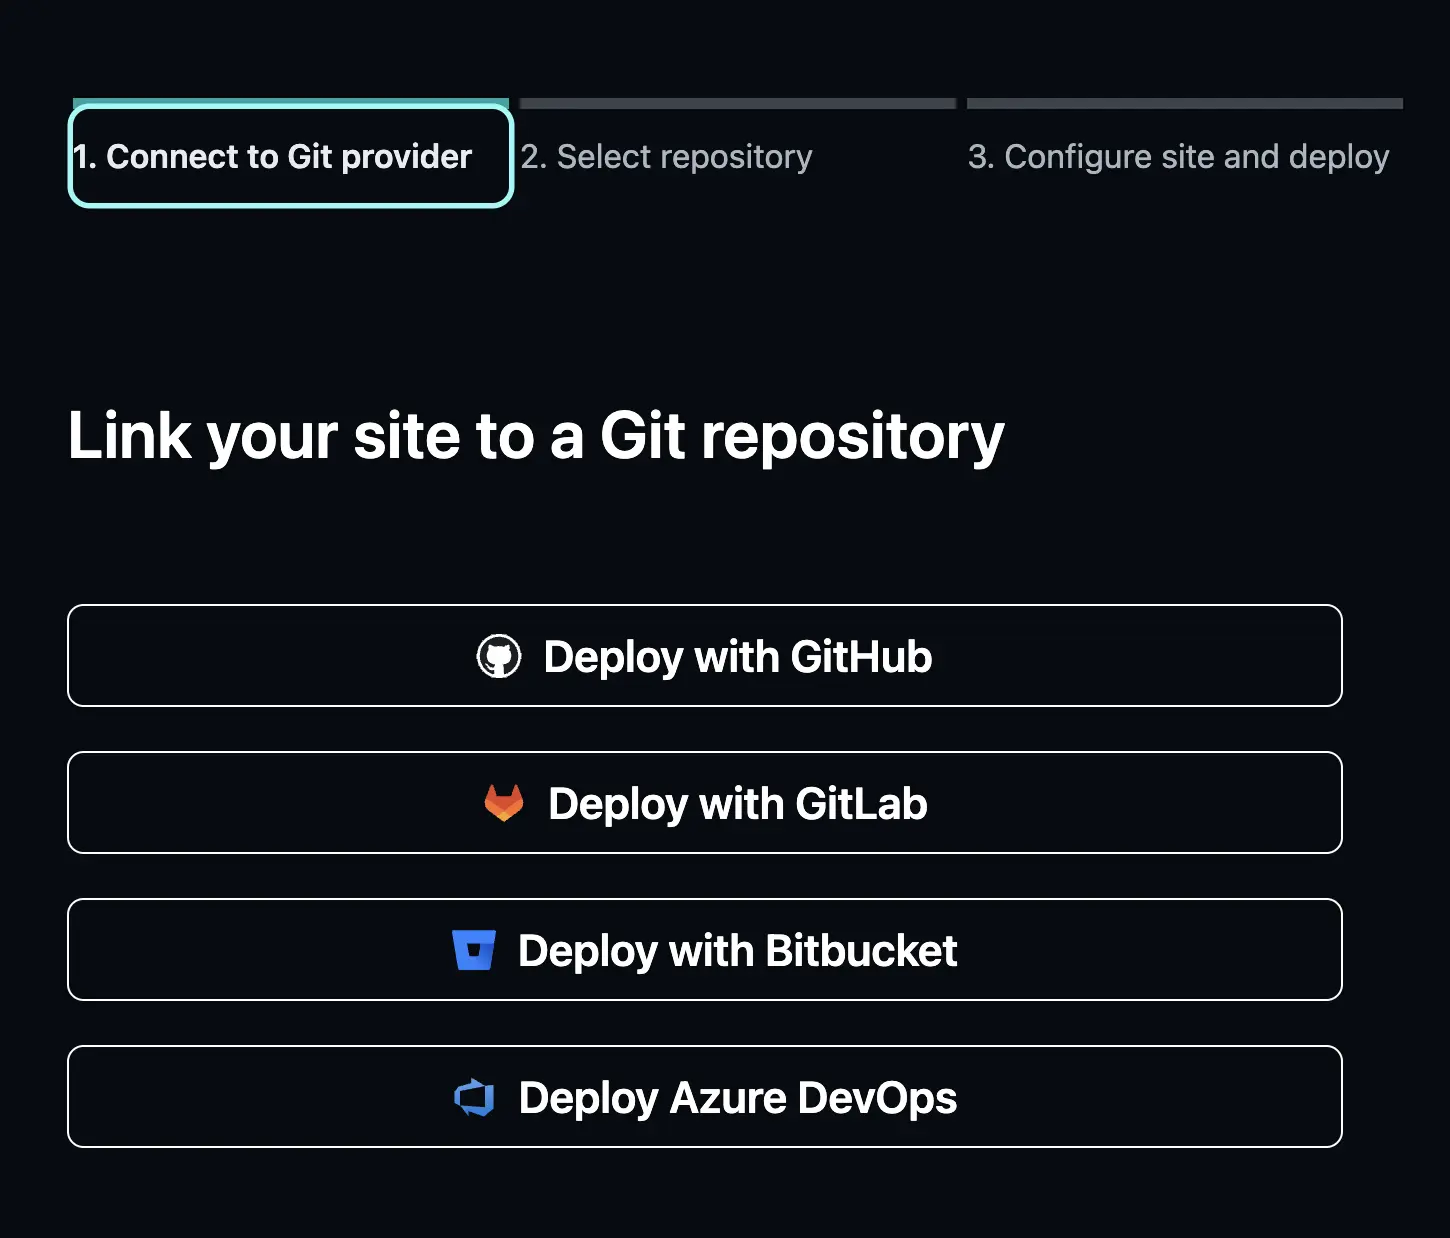
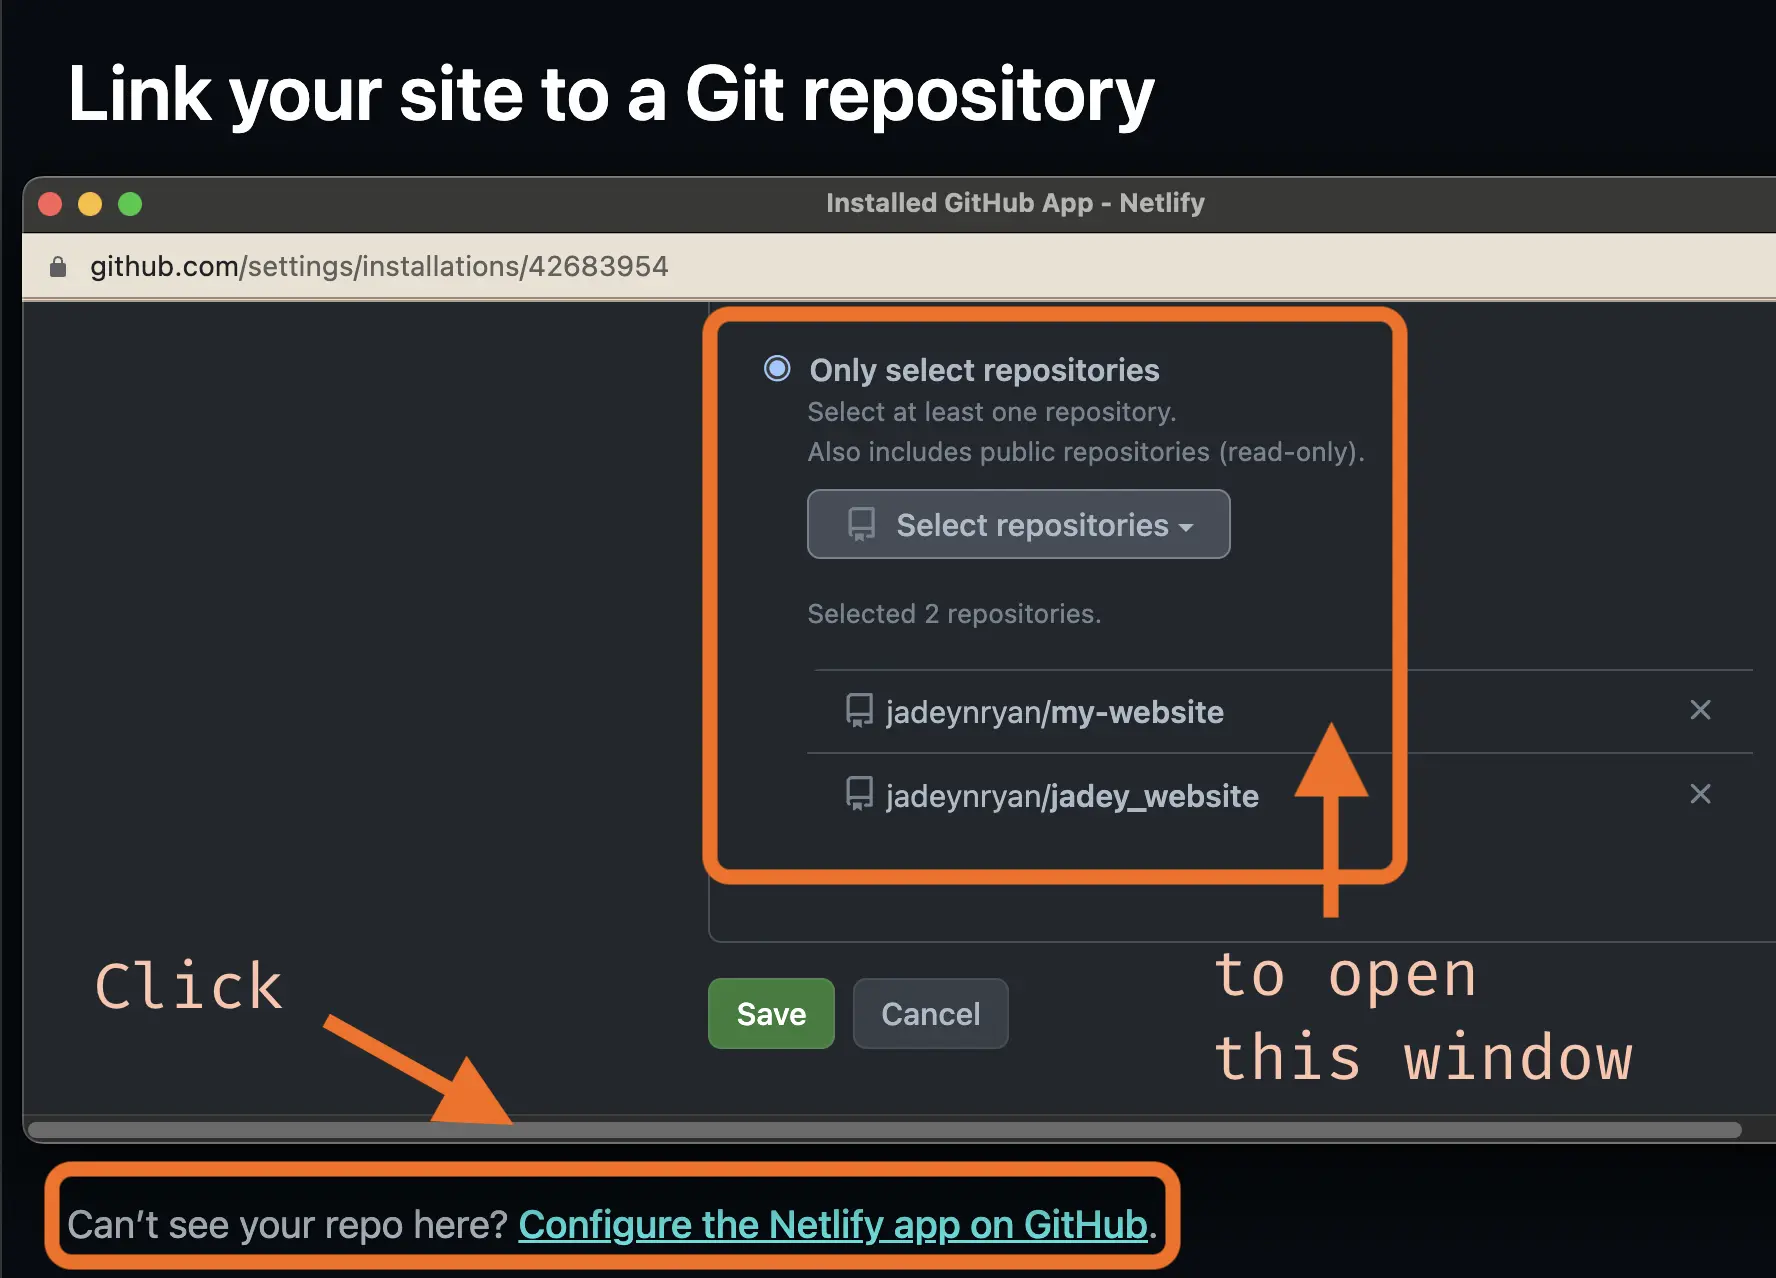
If you’re already logged into GitHub, it should immediately authorize and allow you to select which repositories the Netlify app can access.
If this is your first time deploying with Netlify and GitHub, you’ll likely need to click the bottom link Configure the Netlify app on GitHub. This should open a new window where you can make sure the Netlify app is installed on your GitHub and select which repositories it can access.
After selecting the correct repository, configure the build settings on the next screen. Enter _site in the Publish directory field:
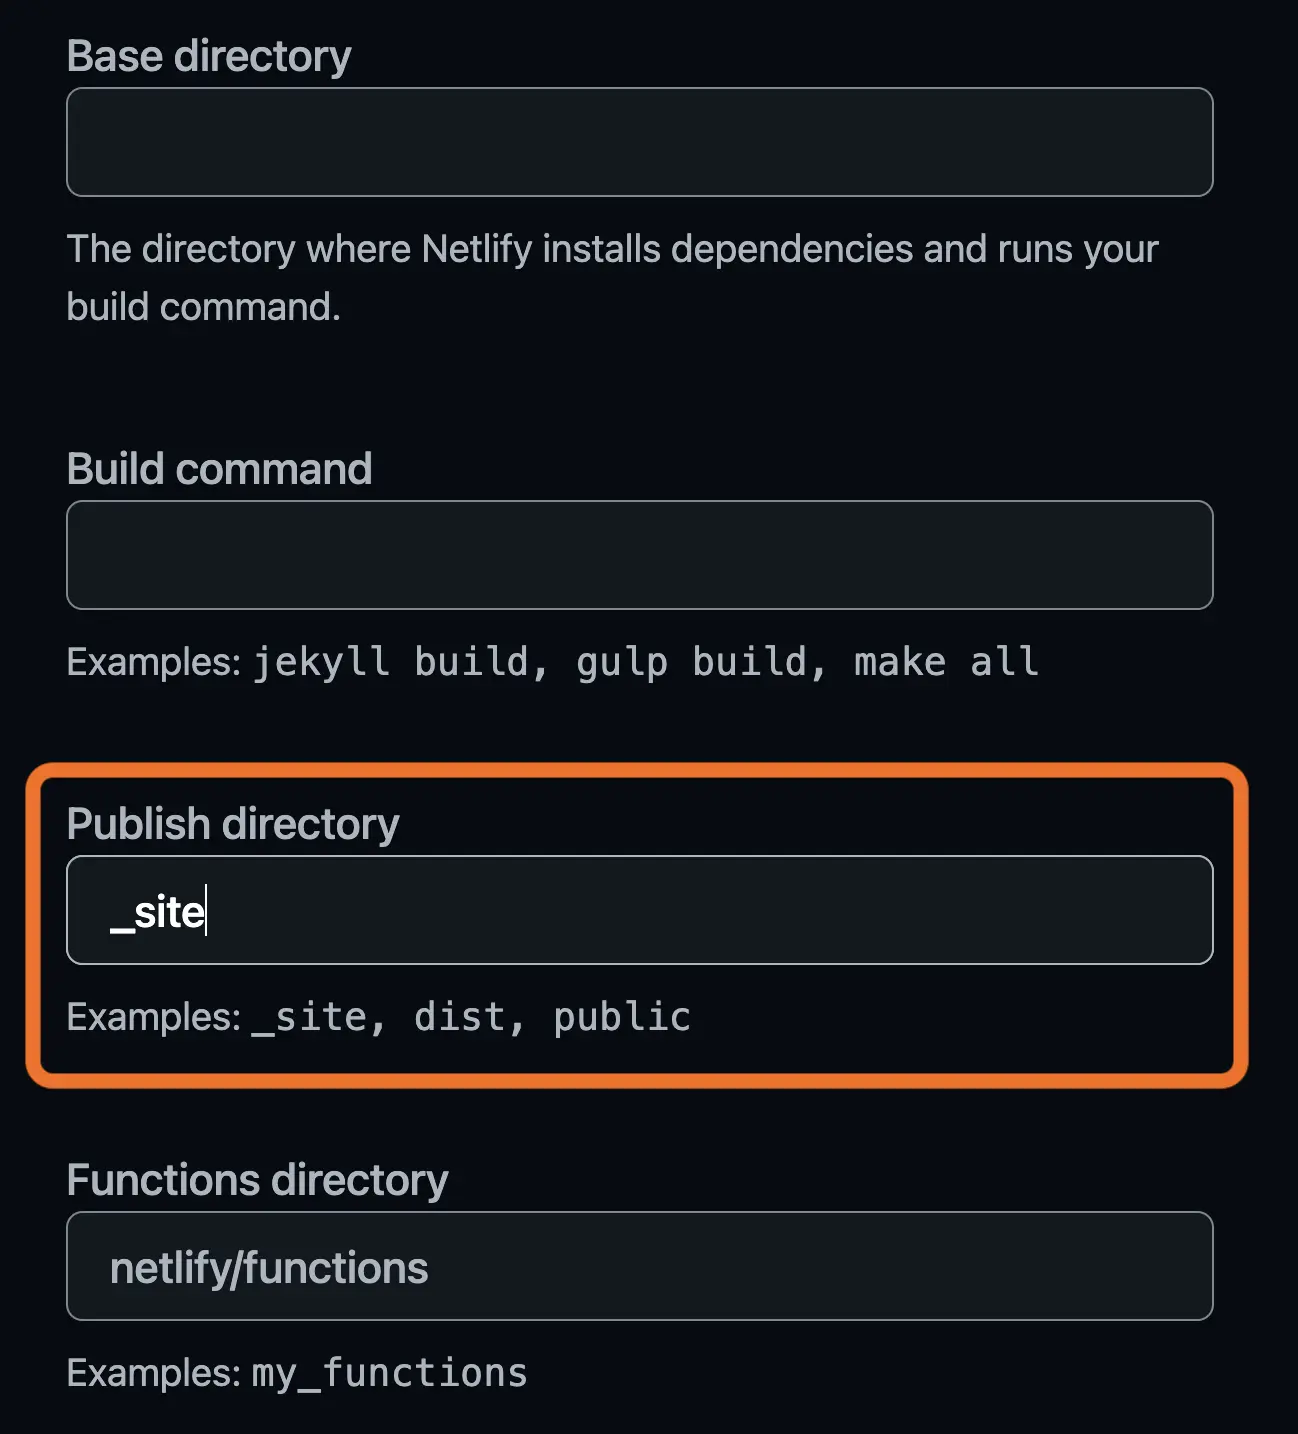
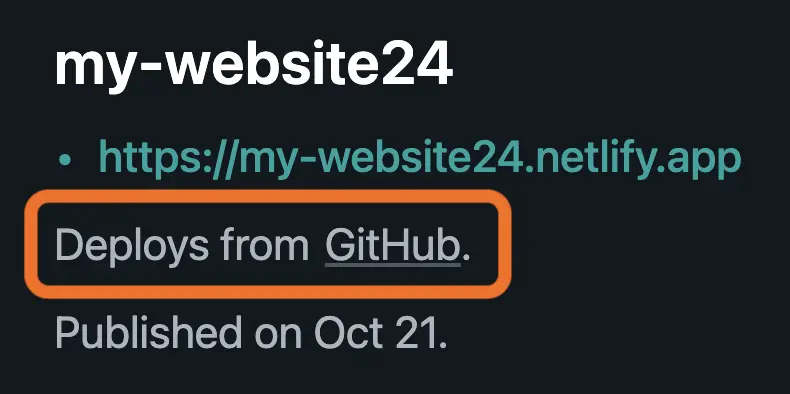
Then click Deploy my-website24, which take us back to our site overview page where it now says Deploys from GitHub instead of Manual deploys.
4.5 Push a change to our repo
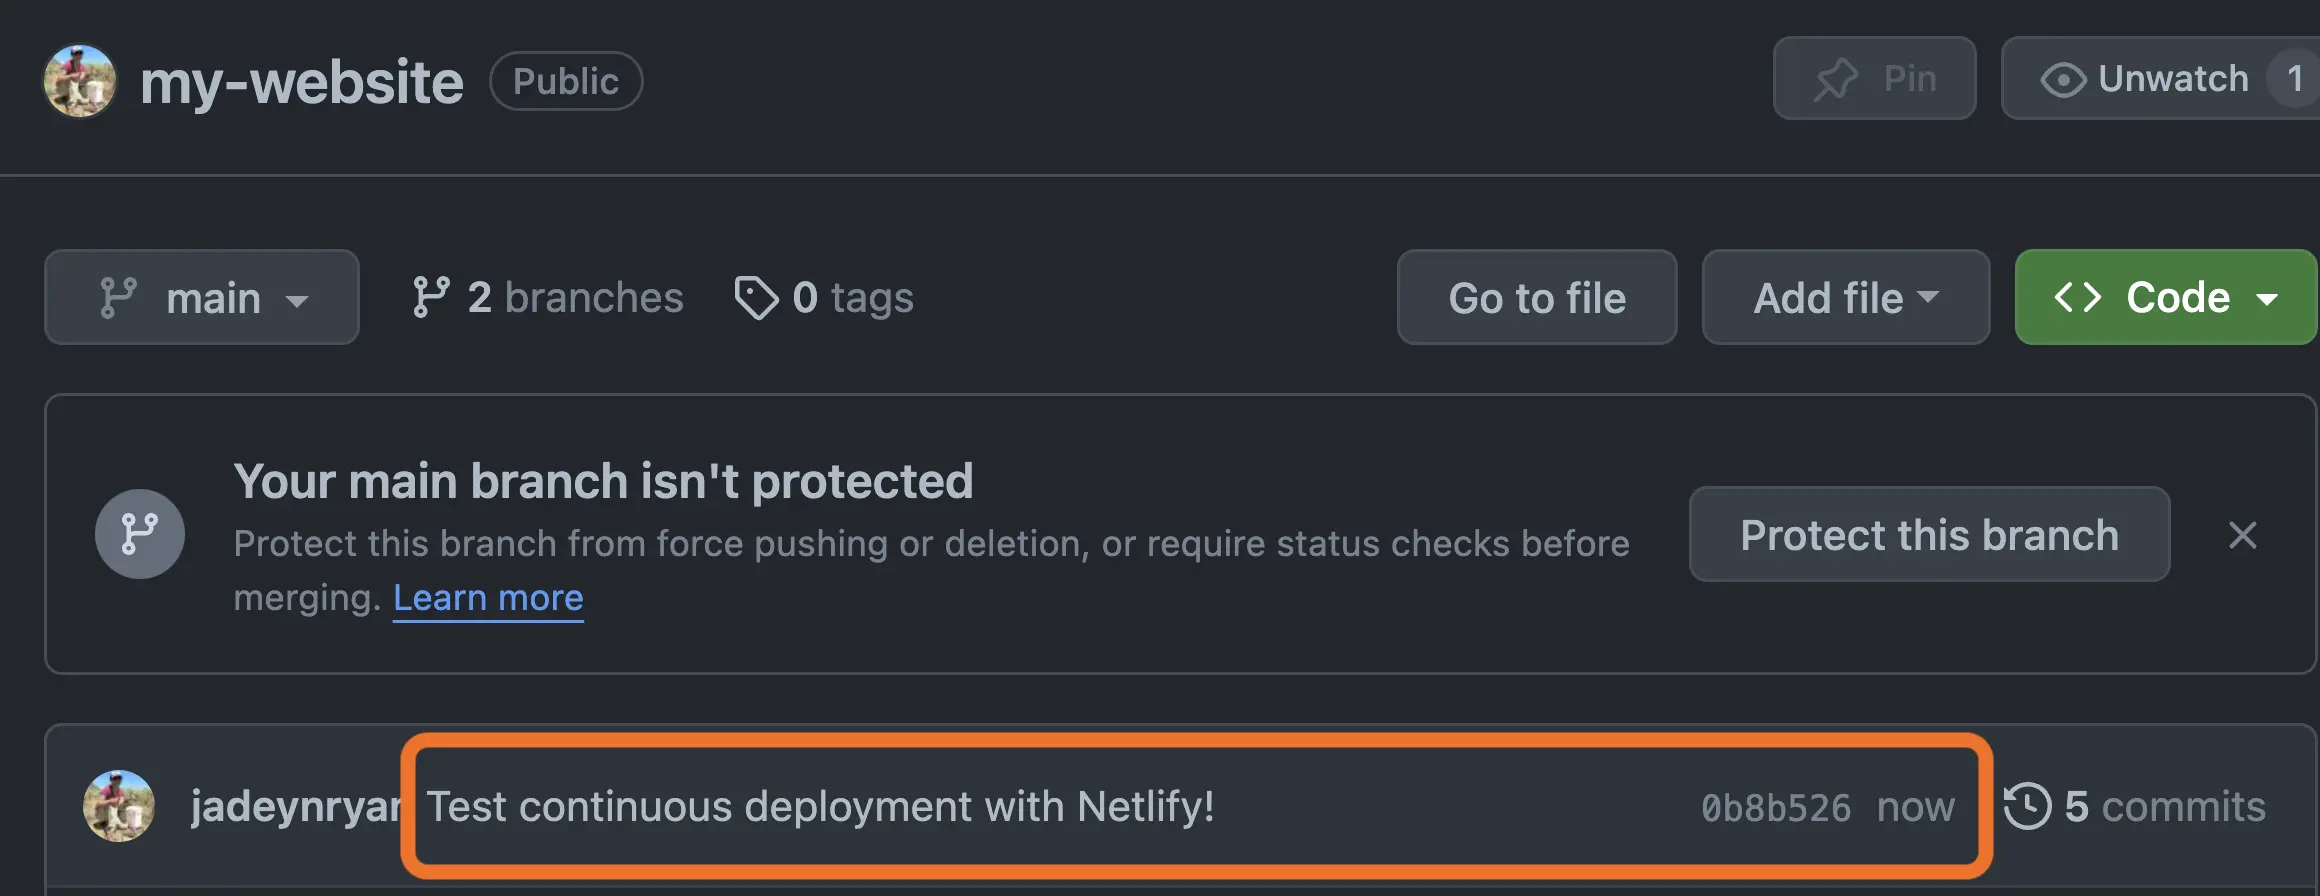
Let’s push a change to our repo and make sure it automatically redeploys and republishes our website!
Add some content to about.qmd, run quarto render in the terminal, and then push to main.
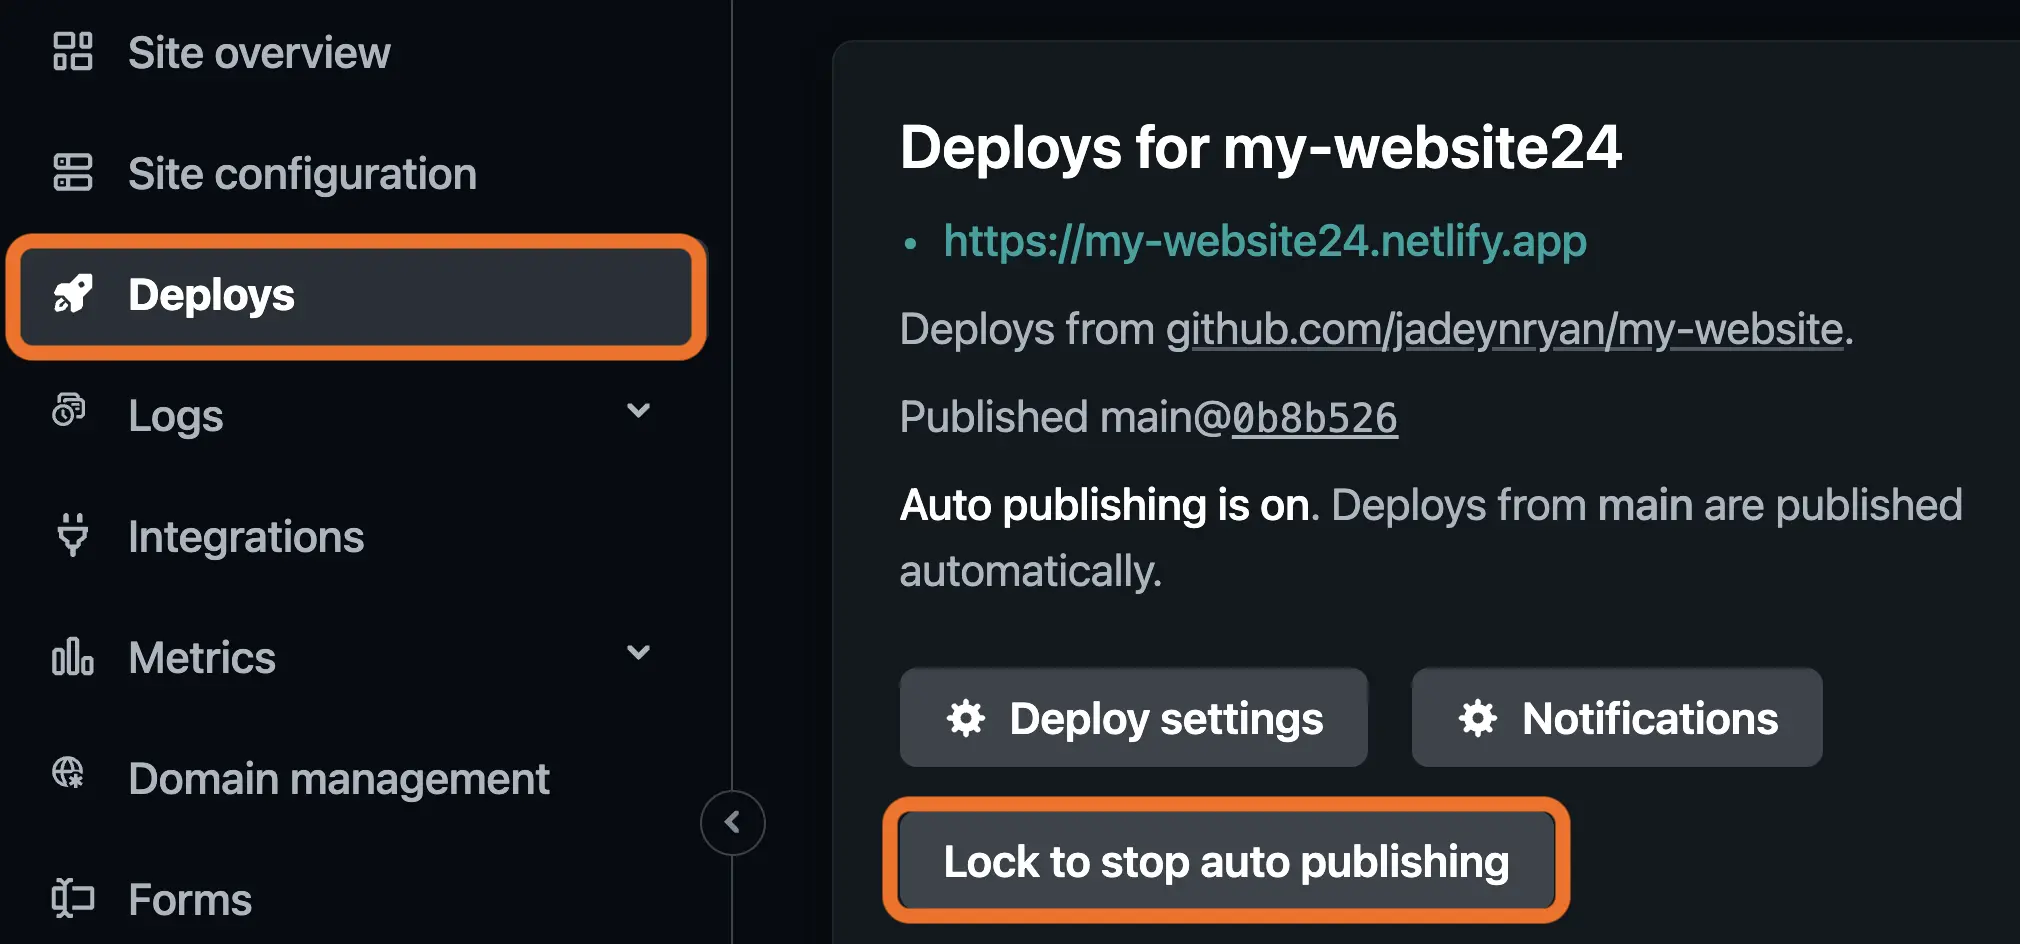
The Deploys page on Netlify tells us that we successfully published from main@0b8b526.

Auto publishing
By default, auto publishing is turned on in the Netlify deploy settings. This means all successful deployments are automatically published to the public site.
Optionally, you can turn this setting off so that you have to click Publish to send the deployment to production. If you do want to turn it off, go to Deploys > and then click Lock to stop auto publishing.
The site will still deploy every time you push changes to your repo, but you need to click a button to actually publish this latest deployment. This is a good option if you don’t want to work in new branches or use pull requests/merges, but still want to preview your site before sending it to production.
For my personal website, I don’t have this turned off so that the site will automatically publish anytime I push to GitHub. Otherwise I might forget to click Publish and wonder where my changes are 😅.
Netlify docs provide more detail about auto publishing.
5 Branch deploys and deploy previews
As we work on our website styling, content, and features, we probably want to preview our changes without messing up our live site. This is where the Netlify deploy preview system comes into play!
The table below (adapted from Netlify docs) provides a quick comparison of the differences between branch deploys and deploy previews.
| Branch deploys | Deploy previews | |
|---|---|---|
| Default setup | Must setup on Netlify website7 | No setup needed |
| URL | < ex. https:// |
deploy-preview-< ex. https://deploy-preview- |
| Access | Deploys section on Netlify | Deploys section on Netlify or Netlify bot comment on GitHub pull/merge request |
| Scope | Changes from feature branch | Changes from pull/merge request |
5.1 Branch deploys
Branch deploys are great if you typically use feature branches in your workflow.
By default, only the production branch (typically main) is automatically deployed by Netlify.
To enable branch deploys on other branches, we need to change the branch deploy setting. On the Netlify website > Site Configuration > Build & deploy > Continuous deployment > Branches and deploy contexts > Branch deploys > Configure > select the All radio button > and then click Save.
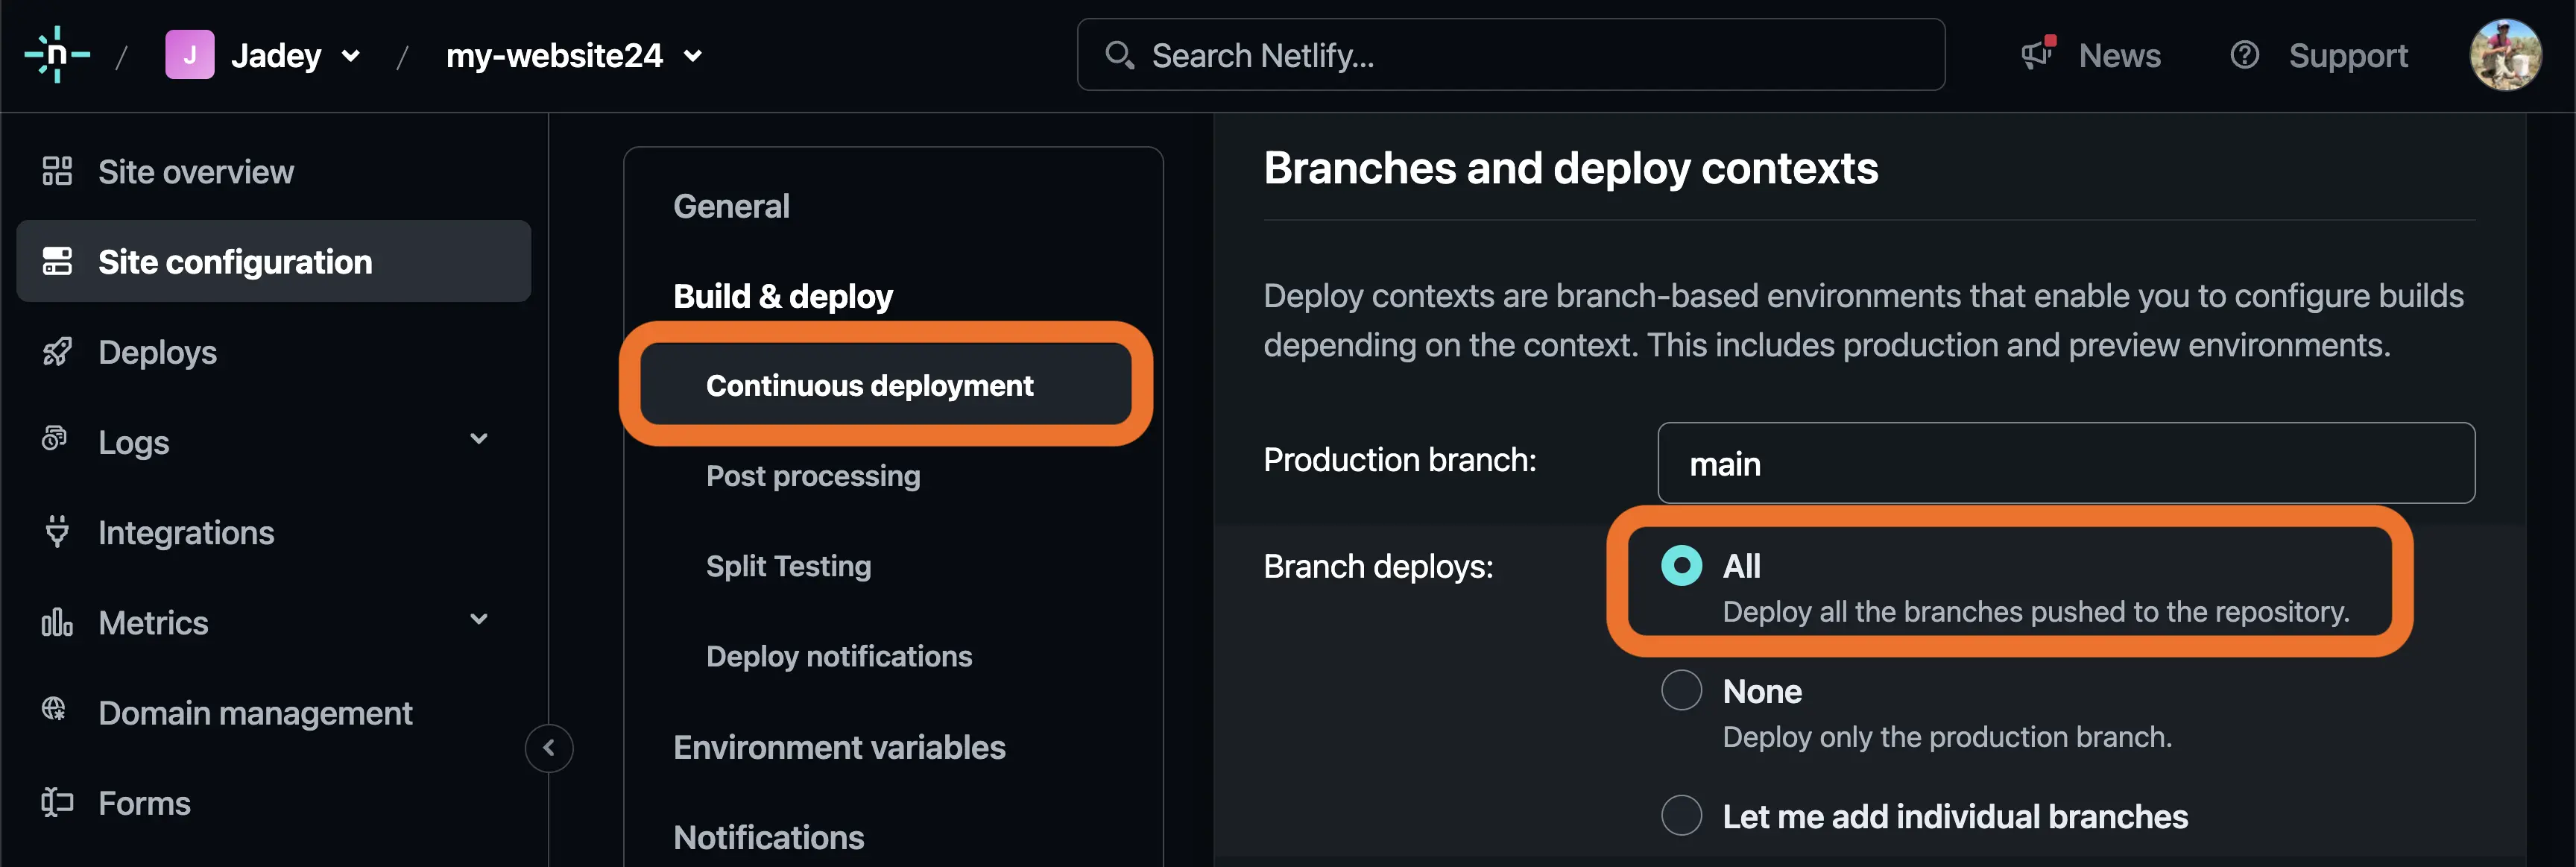
Or, if we only want to deploy previews for a specific branch, select Let me add individual branches and then enter the name of that branch.
Let’s try it out by creating a new branch called staging and pushing a commit to it.
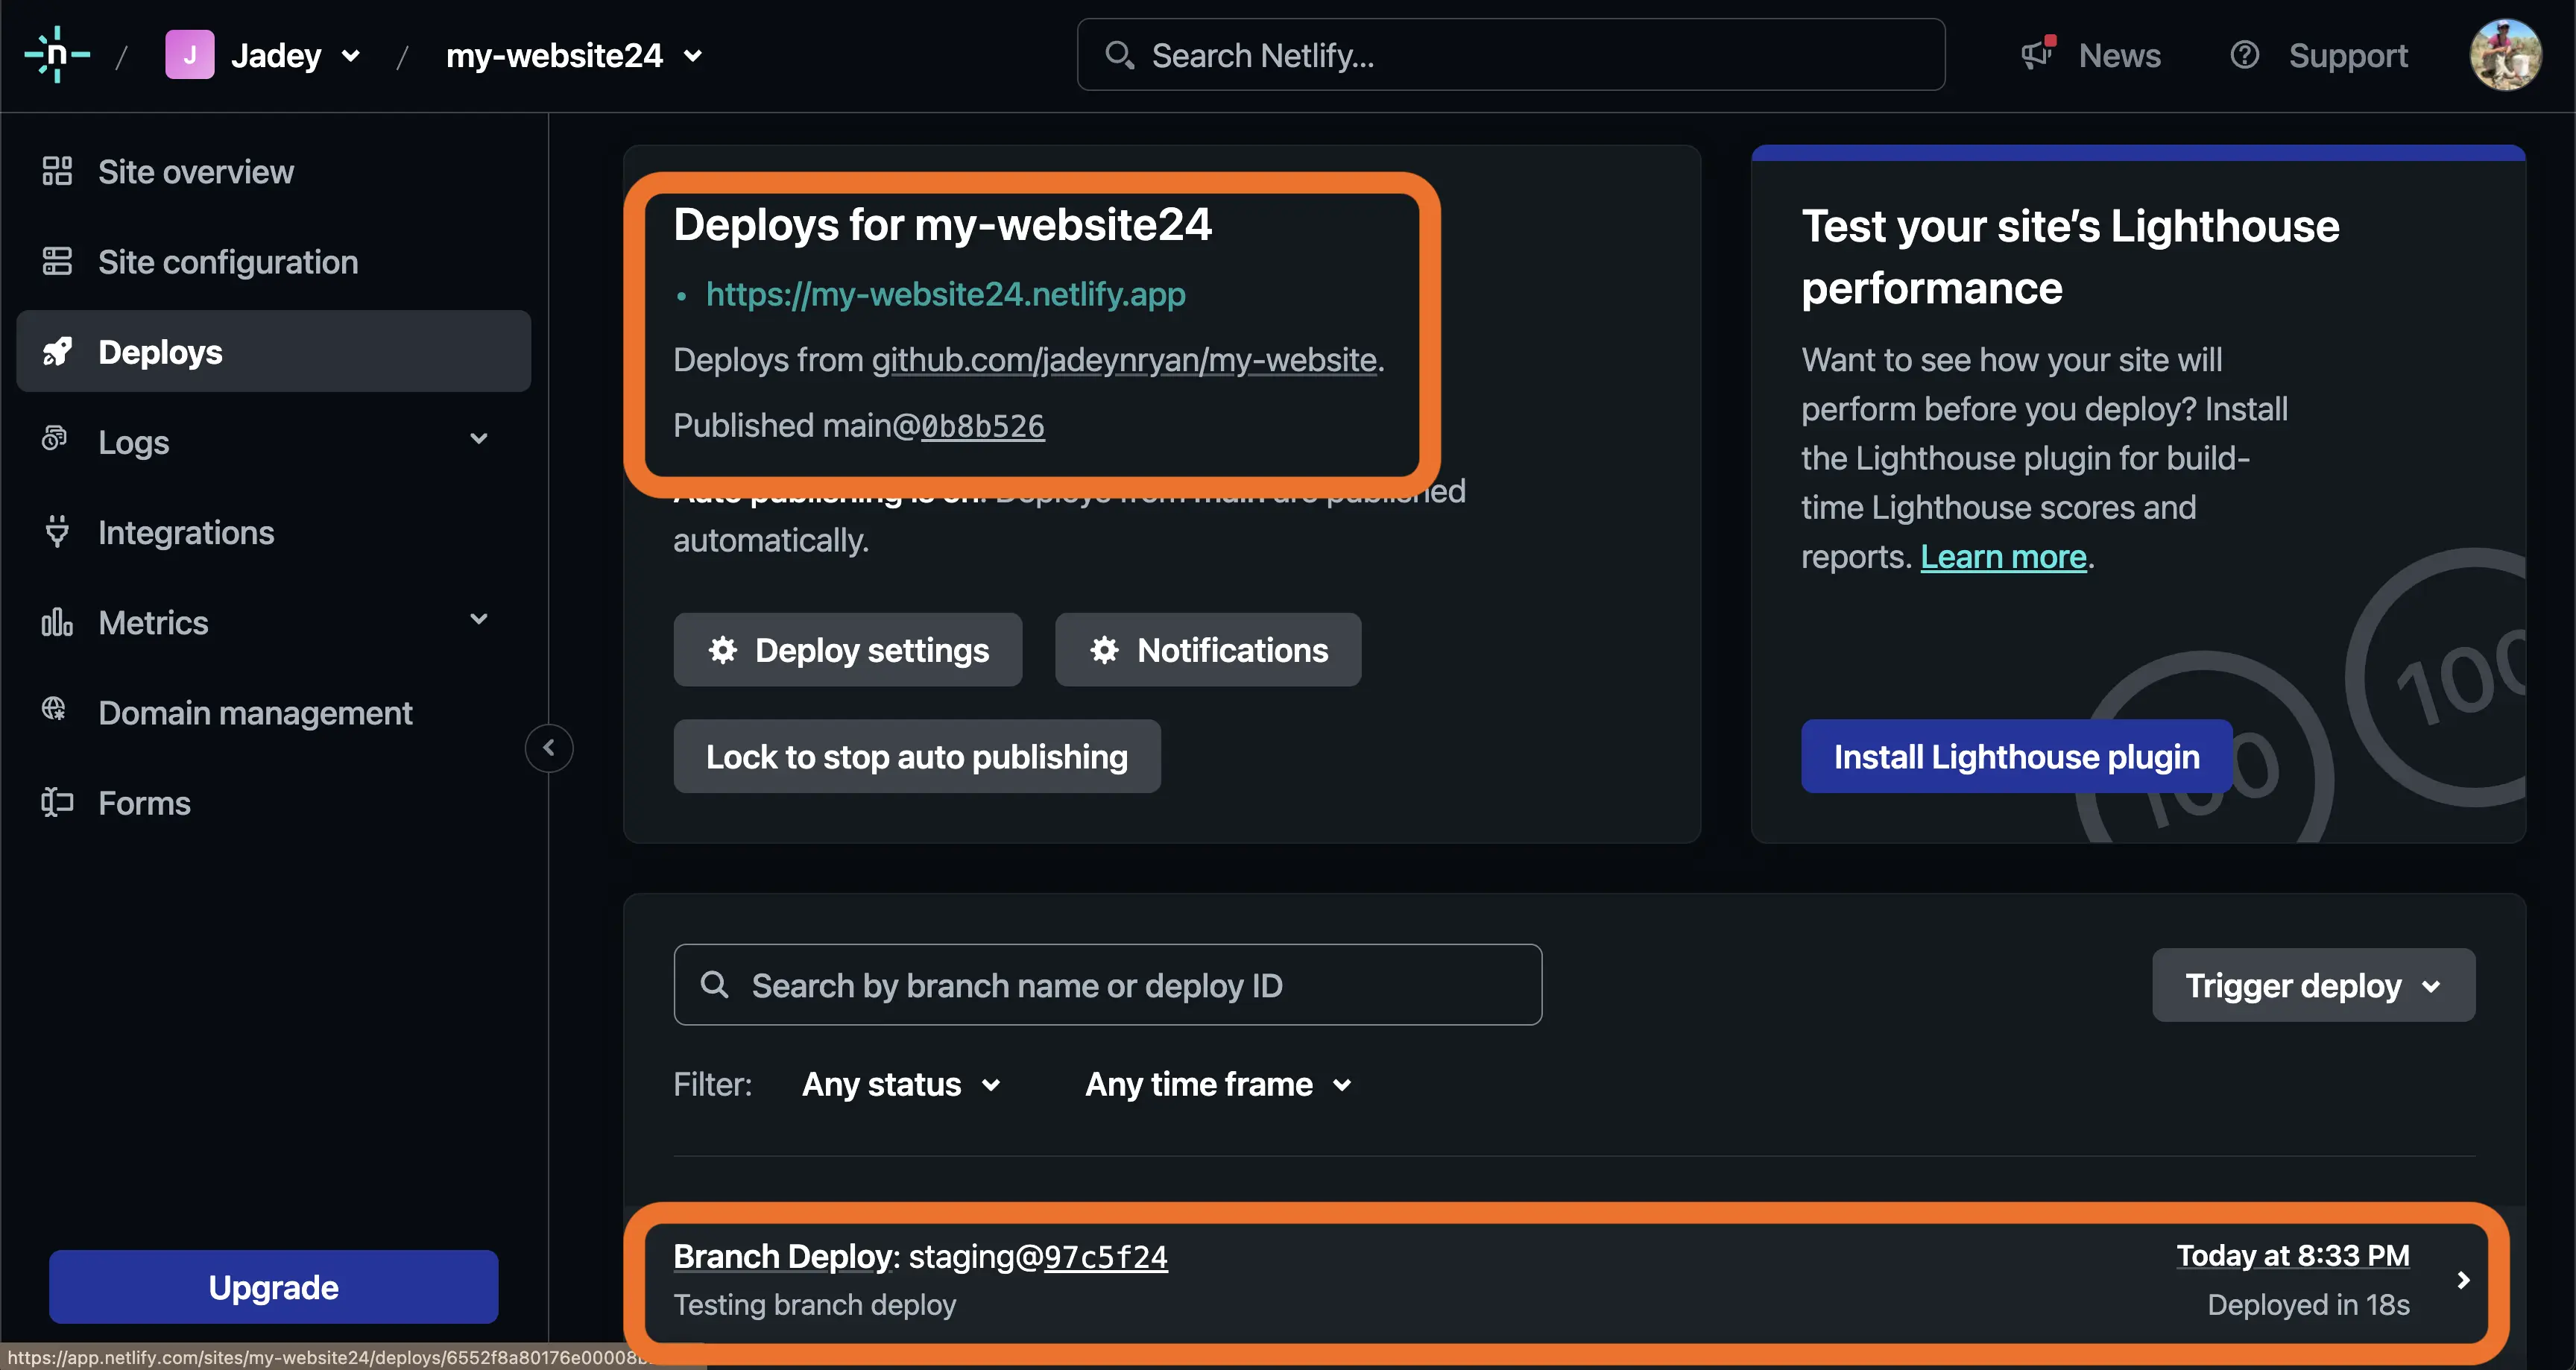
On the Netlify Deploys page, we see our live site is still published from main, but we now have a Branch deploy from the staging branch that we can click to preview.
Once we merge our staging branch into main, those changes will be published to our site in production.
5.2 Deploy previews
Deploy previews are enabled by default once our Netlify site is linked with our GitHub repository. Every time we make a pull request or merge, Netlify will deploy our site and then provide the links to the deploy information as a comment in the pull request/merge conversation on GitHub.
From our GitHub repository, create a pull request to merge our staging branch into main.
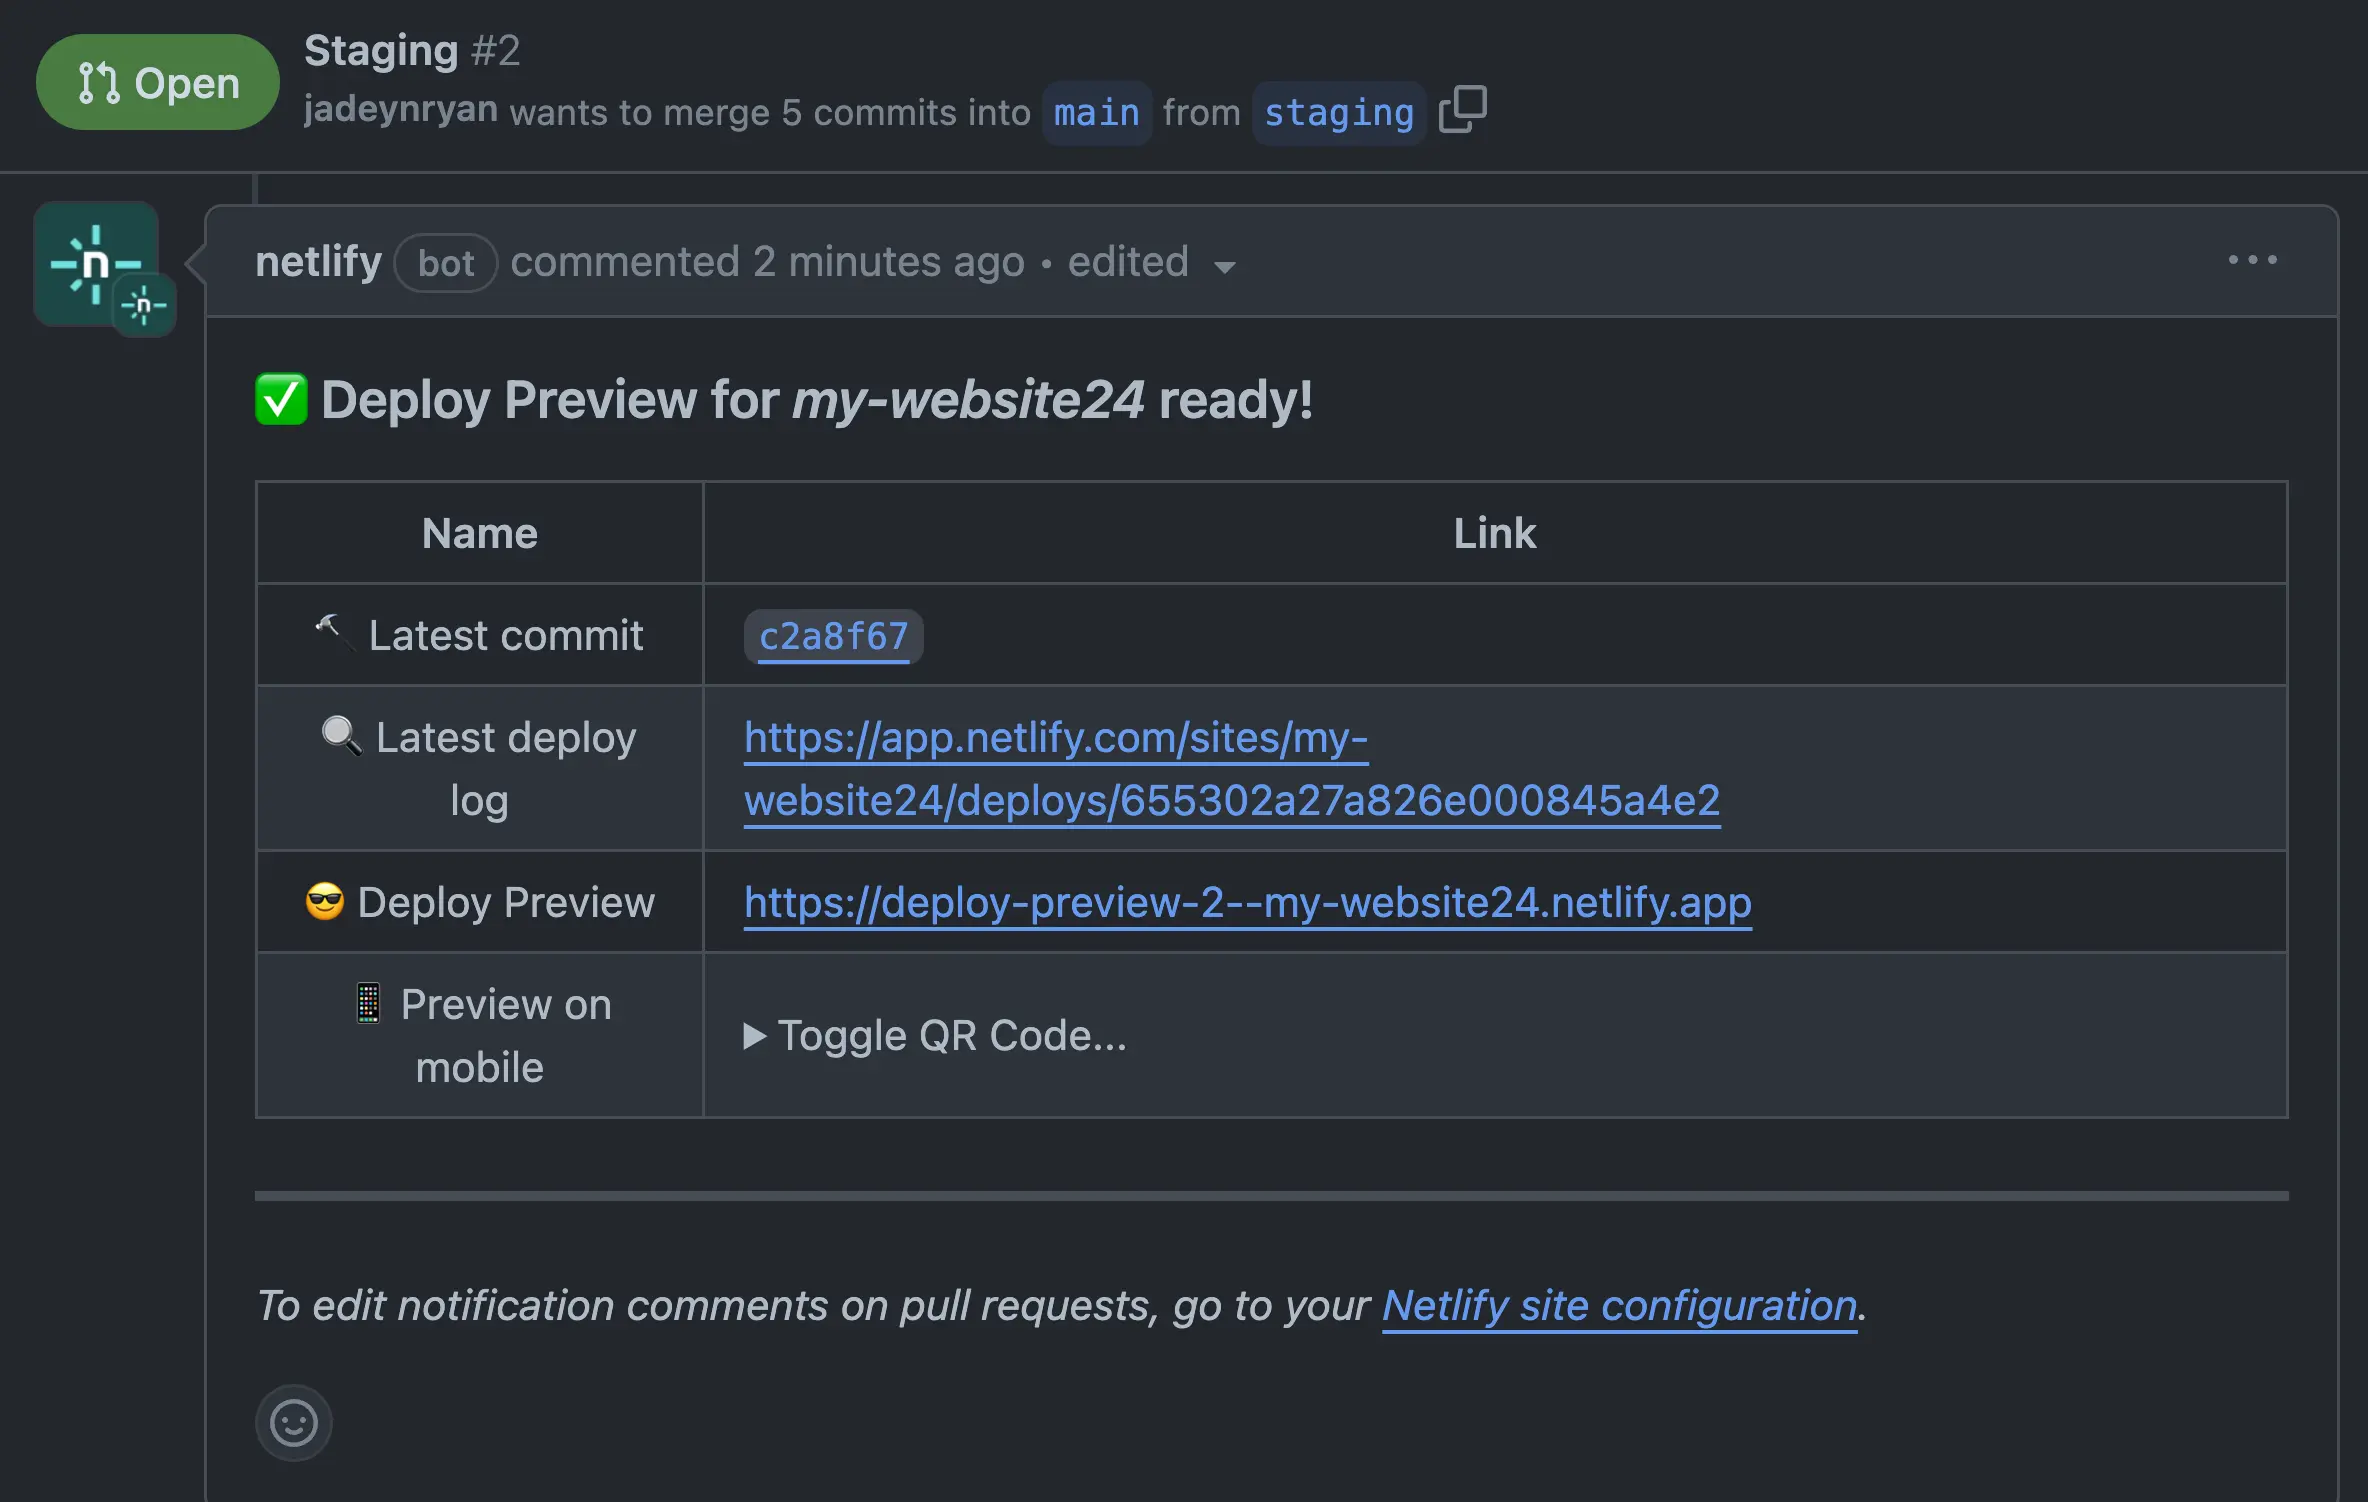
This triggers Netlify to deploy the site and then comment all the information for the deploy preview including a link to the commit, the deploy log, preview link, and a QR code to preview on a mobile device.
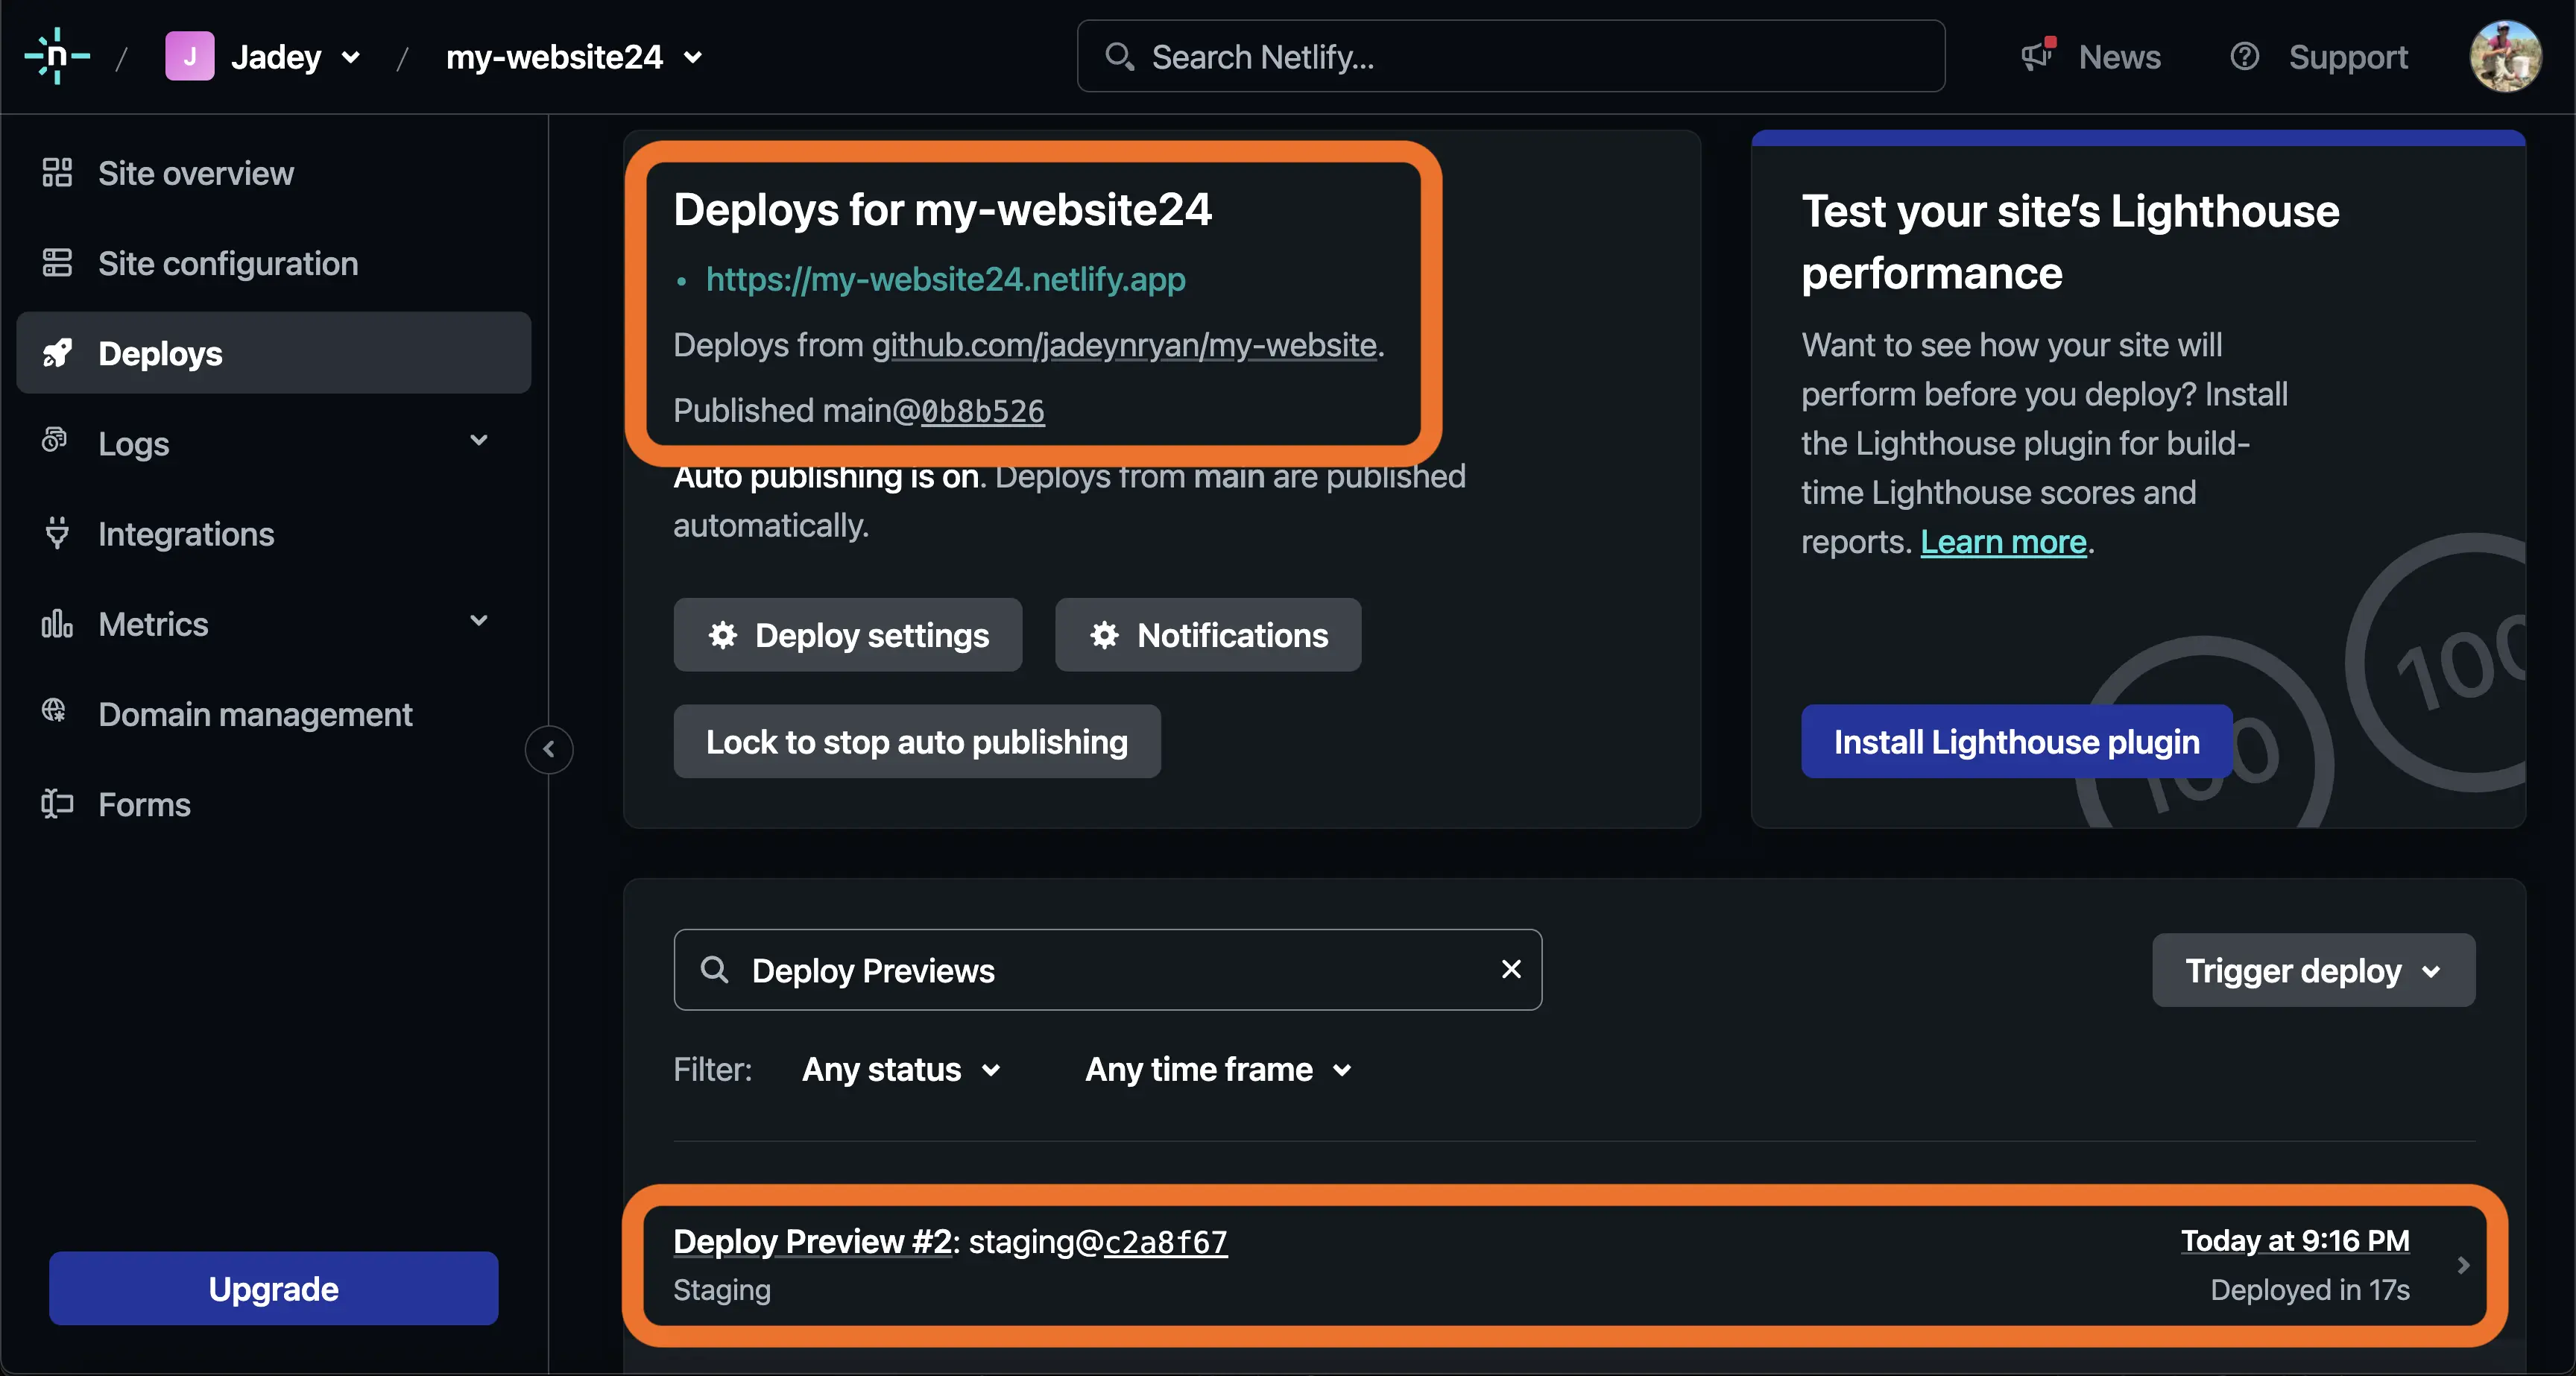
We can also access our deploy preview from the Netlify Deploys page. Similar to the branch deploy, our live site is still published from main, but we now have Deploy Preview #2 from staging. The #2 just means this was the second pull/merge request in our repository.
Once we complete our pull request and merge to main, those changes will be published to our site in production.
6 Lighthouse plugin
Another benefit of Netlify are the integrations with different web tools. The only one I’m using so far is the Google Lighthouse tool, which helps me abide by my accessibility commitment.
Once installed, the Lighthouse plugin audits our site for performance, accessibility, best practices, and SEO at build time. The Lighthouse report gives us scores for each of these four categories.
To enable the plugin, on Netlify > go to Integrations > search for lighthouse > then click Enable.
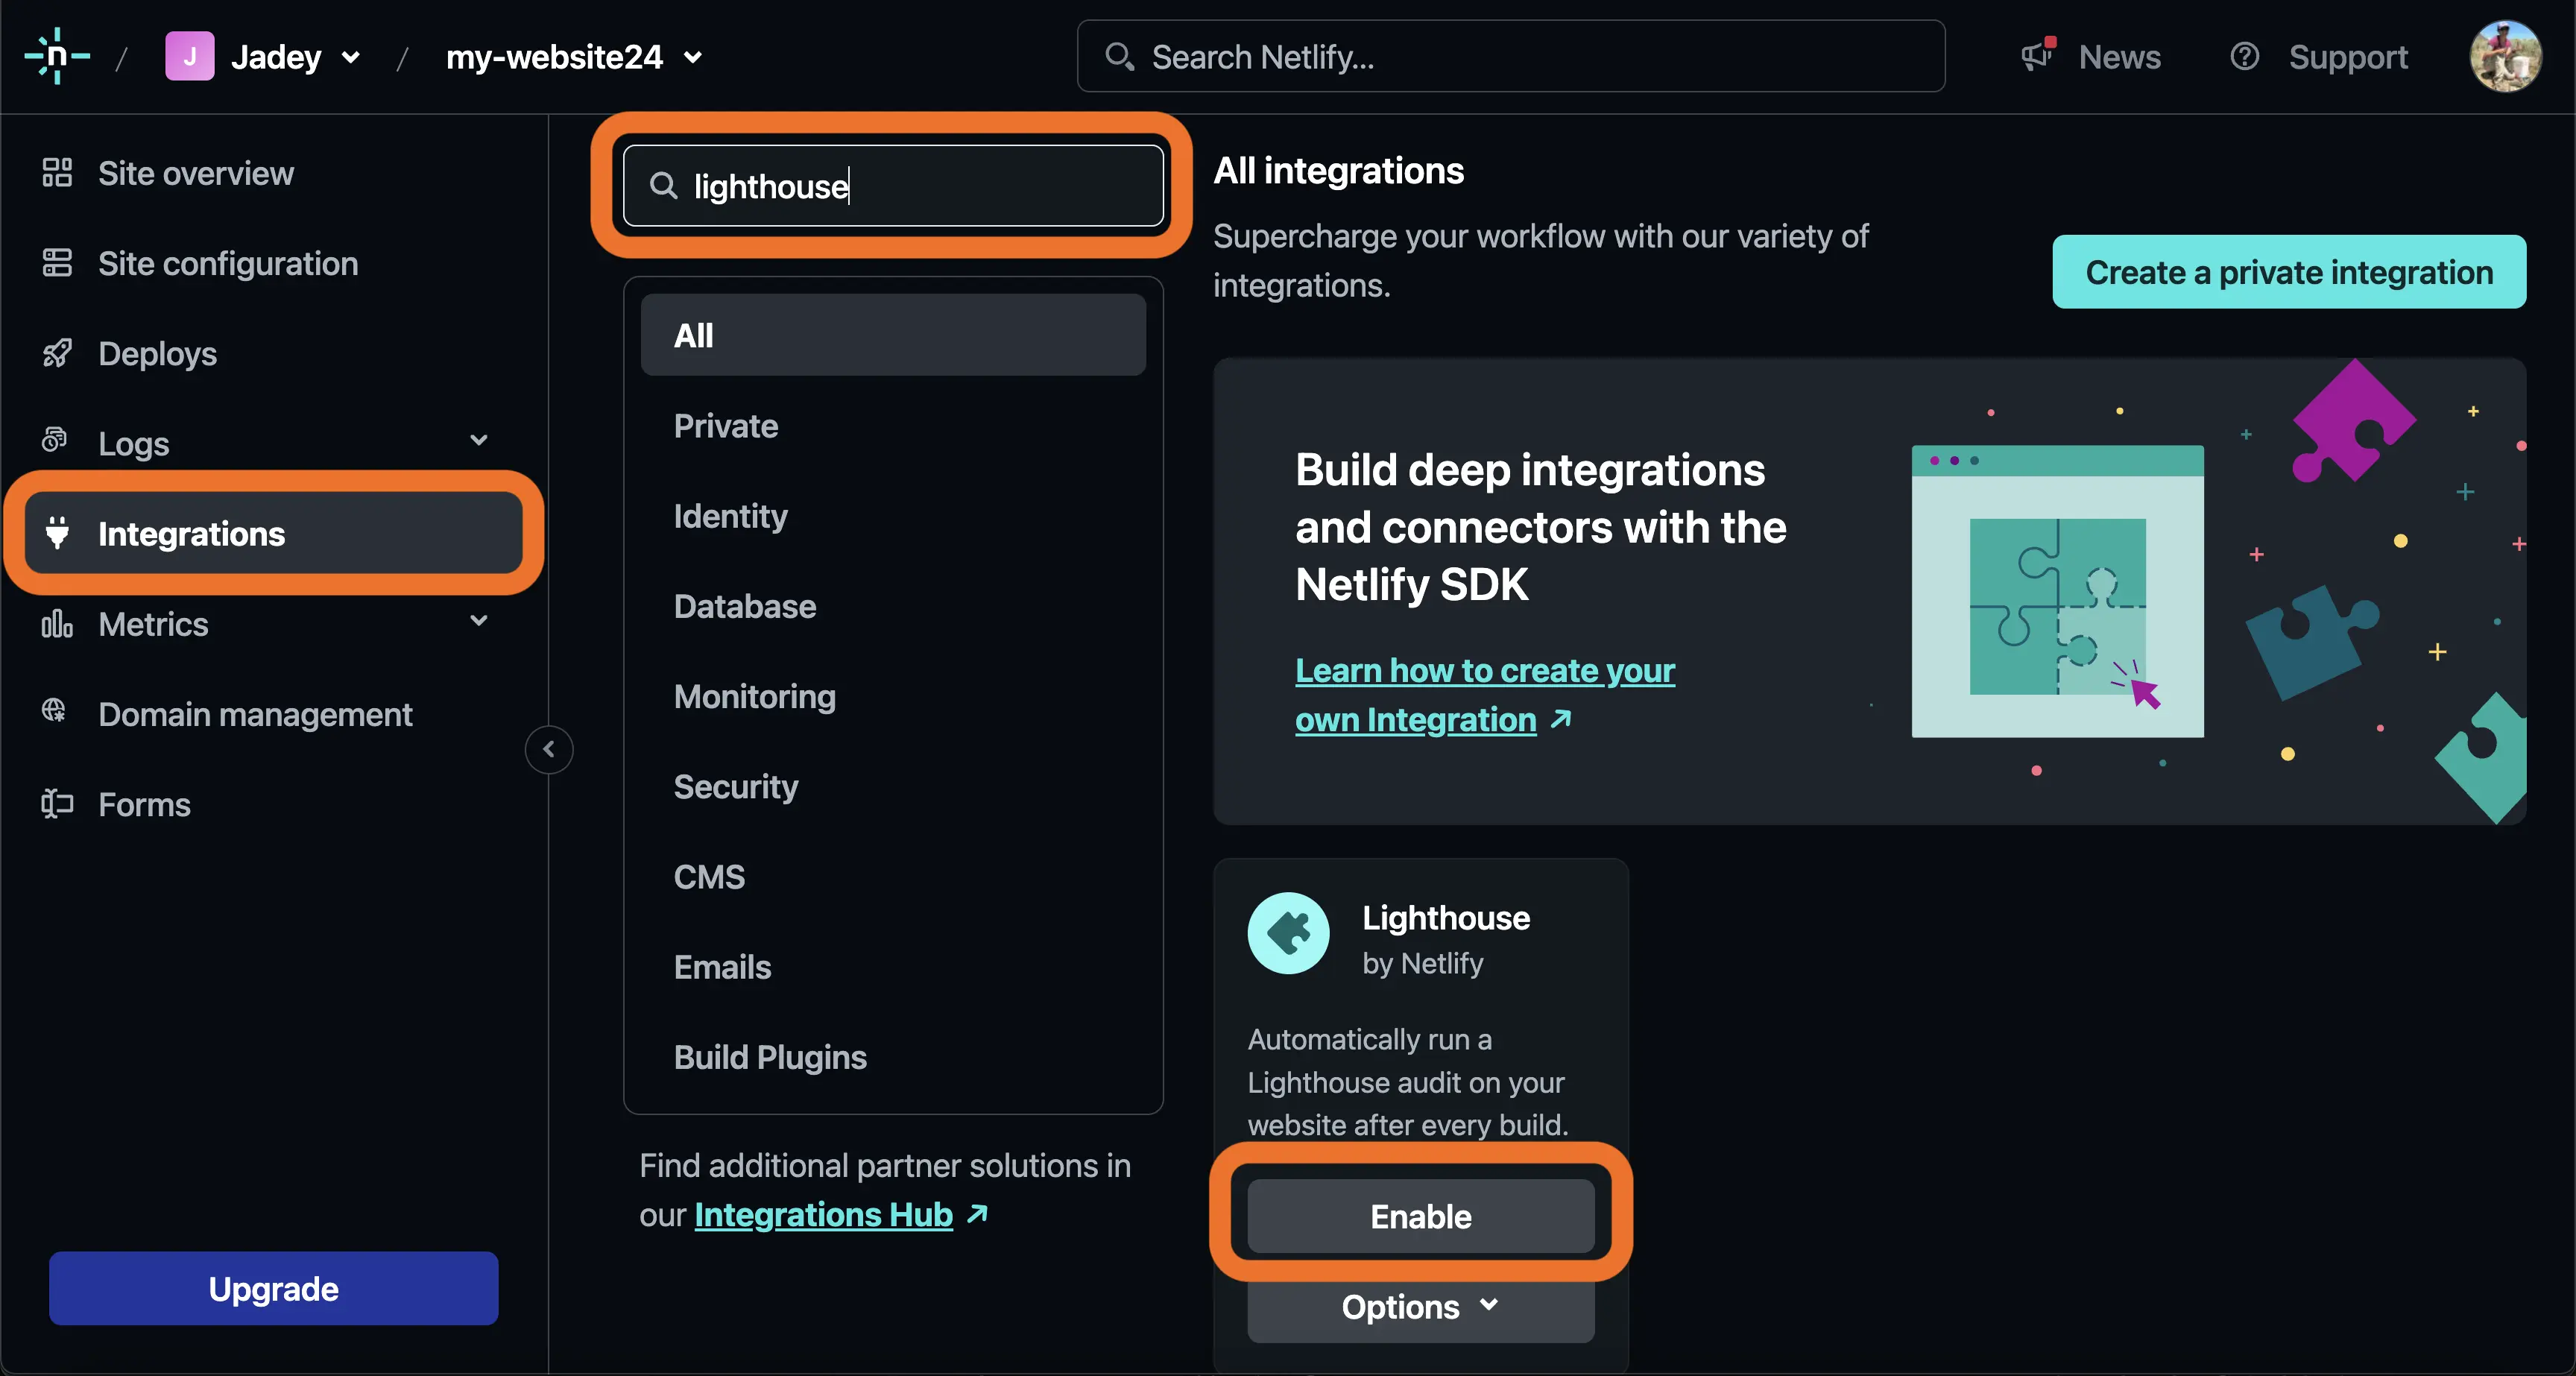
Netlify will then ask if we’re sure we want to install Lighthouse on our website.
If we click Install, the Lighthouse audit will run the next time we deploy our site.
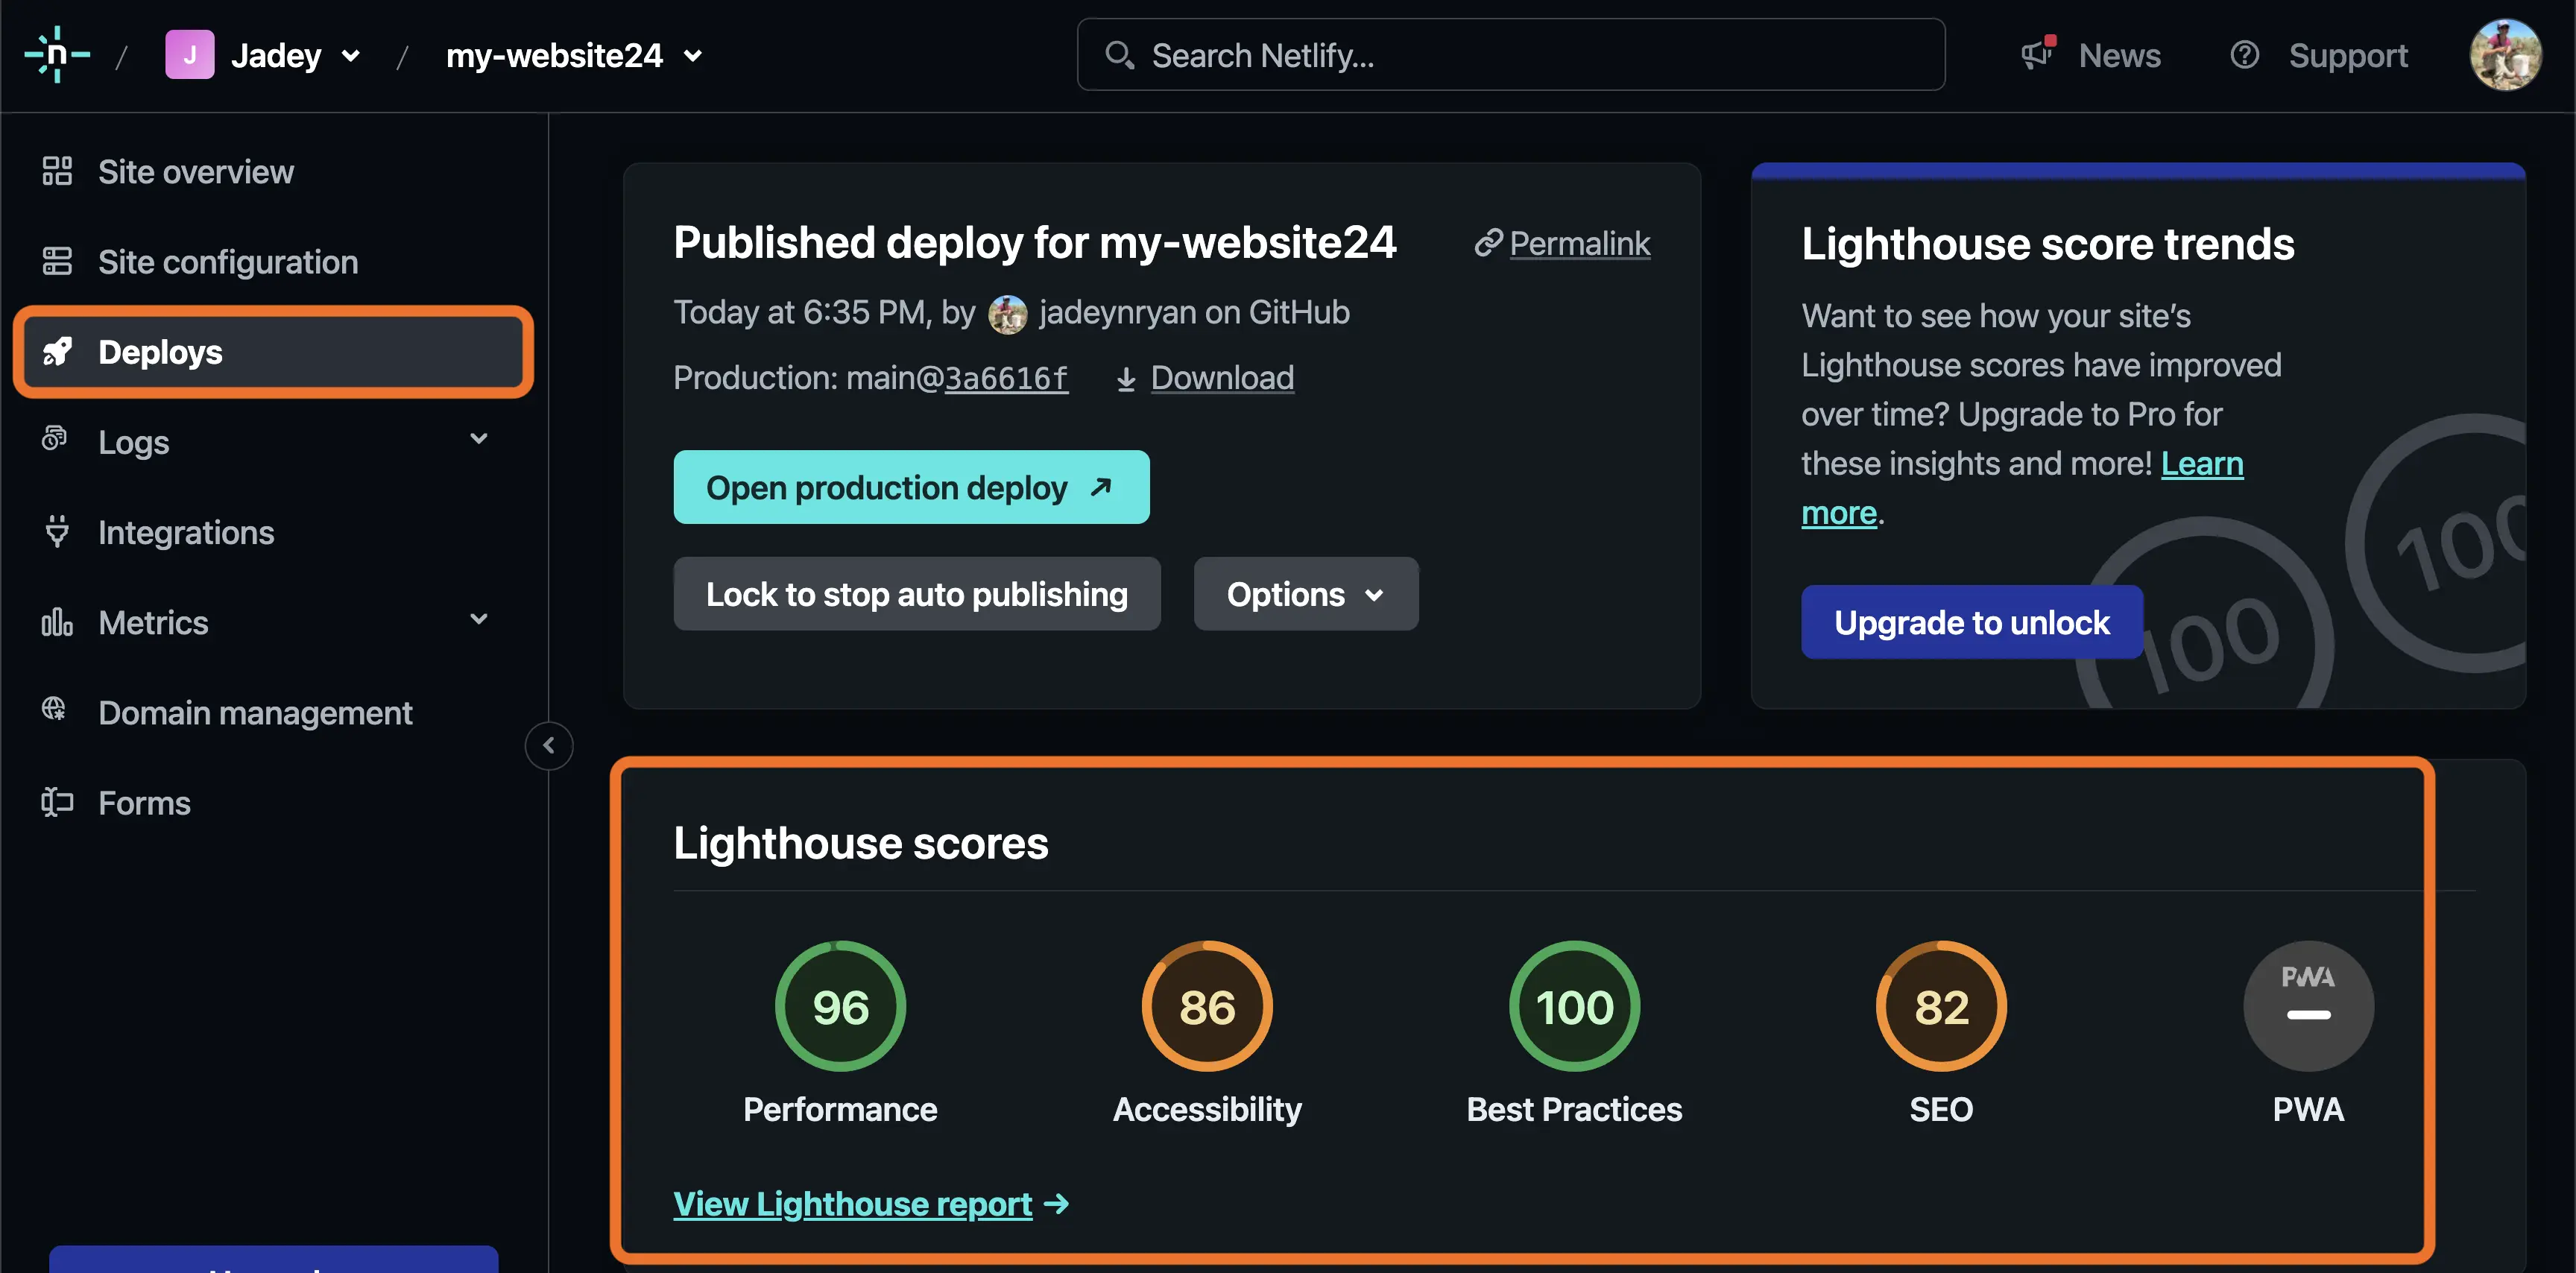
Lighthouse report on Netlify
Regardless of whether we push directly to main or use the deployment preview system, we can always see the Lighthouse scores on the Netlify deploys page.
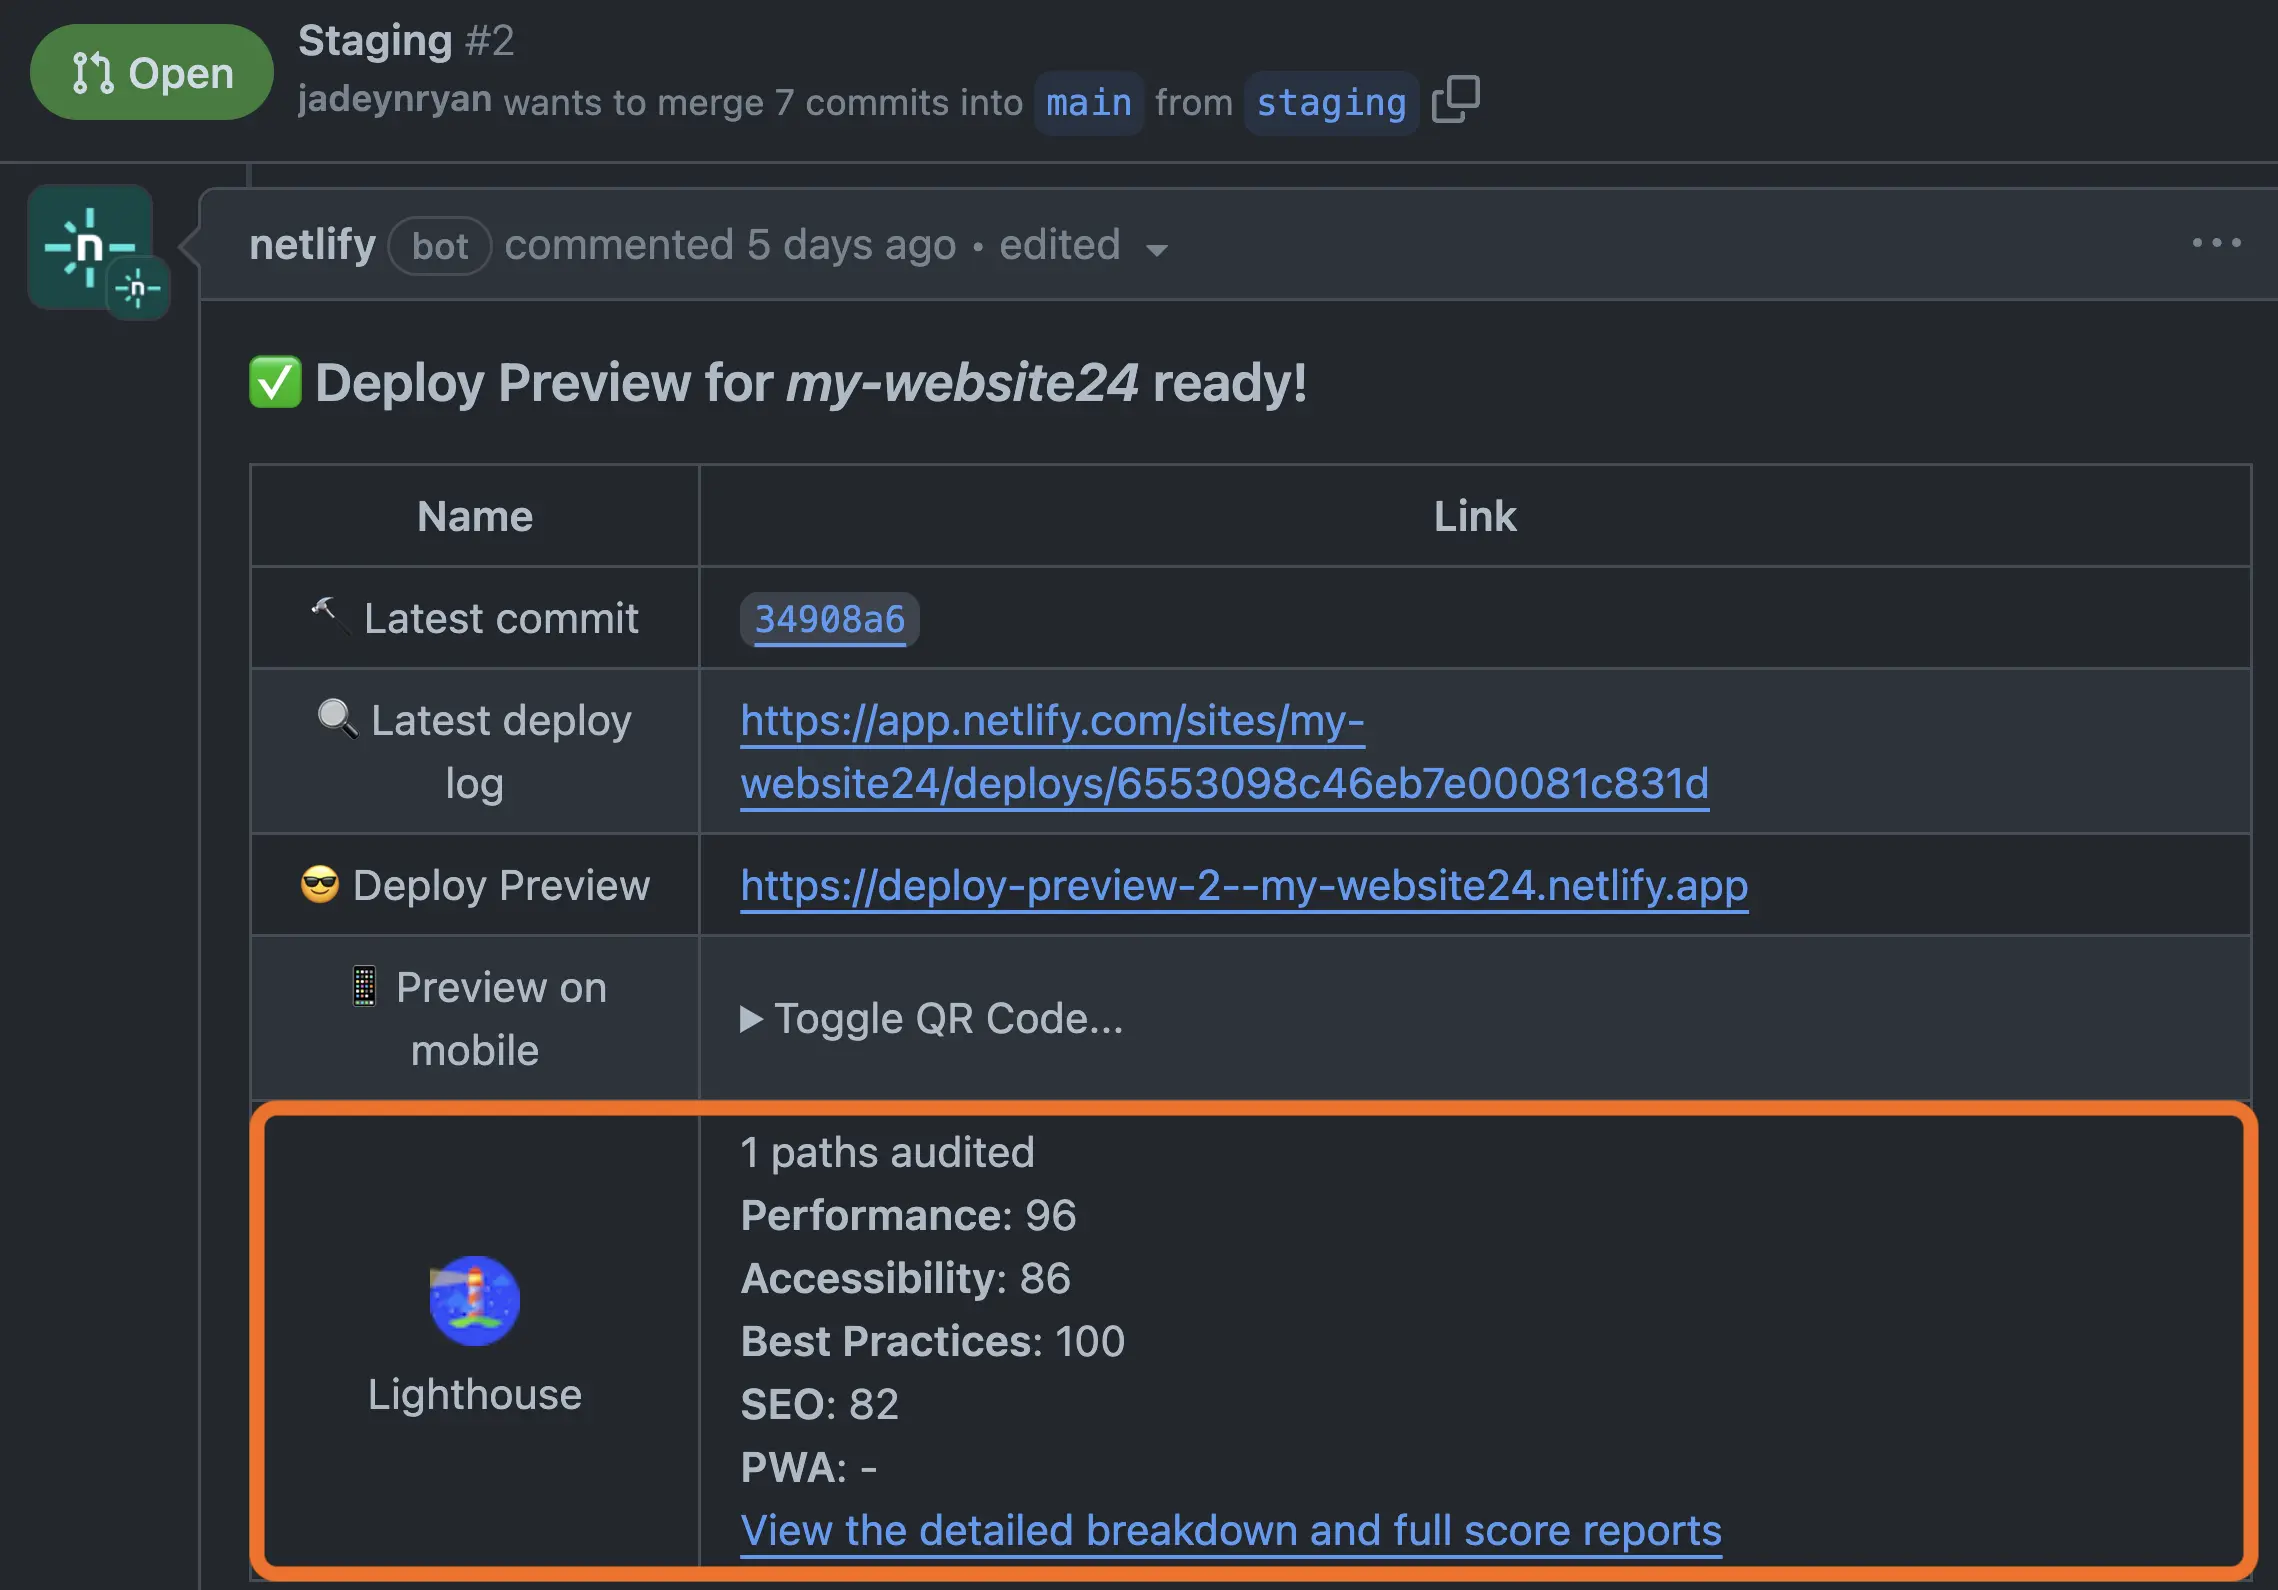
Lighthouse report on GitHub
If we have a pull or merge request open, the Netlify bot will include the Lighthouse scores in its deploy preview comment.
Note
You can also manually run a Lighthouse report in Chrome DevTools. But that takes away from the magic of the automated audit everytime you deploy your site with Netlify 😉.
Workflow
My general workflow for editing my website is:
Add, edit, or remove content.
Run
quarto previewin the terminal and work iteratively.Use
Command+Shift+Con Mac orControl+Shift+Con Windows to open Chrome DevTools and thenCommand+Shift+Mon Mac orControl+Shift+Mon Windows to toggle device mode for testing the webpage responsiveness on mobile.When happy with the changes, run
quarto renderin the terminal.Push changes to GitHub (usually in a new branch).
Preview changes on different devices because I don’t fully trust Chrome DevTools device mode!
Edit based on Lighthouse audit scores.
Rinse and repeat!
Wrap up
I hope you found this post helpful for getting your Quarto website configured with Netlify, GitHub, and continuous deployment!
Since this is my first blog post, I’d love feedback on the style, flow, helpfulness, content, etc. Now that I’ve experienced the massive amount of time and head space writing a blog post can take, I have an even deeper appreciation for all the bloggers out there! Thank you!
References
Bryan, Jennifer, and Jim Hester. 2023. Let’s Git Started | Happy Git and GitHub for the useR. https://happygitwithr.com/.
Csik, Samantha. 2022. “Adding a Blog to Your Existing Quarto Website.” October 24, 2022. https://samanthacsik.github.io/posts/2022-10-24-quarto-blogs/.
Footnotes
See my GitHub stars list for my favorite blogs or Quarto website resources.↩︎
As long we Configure Netlify plugin.↩︎
Unless we have a GitHub Action install R and package dependencies.↩︎
Check out my GitHub issue comment to see what happens if we don’t have
freezeset toautoortrueAND commit the freeze outputs.↩︎I originally bought a domain from Square Space and could not set my Netlify site to that domain due to DNS issues that I don’t fully understand. When trying to add a domain, Netlify gave this error message:
A DNS zone for this domain already exists on NS1, the DNS provider backing Netlify DNS. Please contact NS1 with the domain name for support. Here’s a support forum thread on Netlify with the instructions for pointing a custom domain to a Netlify site. I ended up buying another domain directly from Netlify… DNS stuff is too confusing! 😵💫↩︎We’ve already connected our GitHub account to our Netlify in Create and connect to GitHub and Connect and publish to Netlify, but we still need to pick which repository our Netlify site links to.↩︎
Set up branch deploys by going to Netlify.com > [
Your website] >Site configuration>Build & deploy>Continuous Deployment>Branches and deploy contexts↩︎
Citation
BibTeX citation:
@online{ryan2023,
  author = {Ryan, Jadey},
  title = {Intermediate Guide to Publish a {Quarto} Website with
    {GitHub} \& {Netlify}},
  date = {2023-11-19},
  url = {https://jadeyryan.com/blog/2023-11-19_publish-quarto-website/},
  langid = {en}
}
For attribution, please cite this work as:
Ryan, Jadey. 2023. “Intermediate Guide to Publish a Quarto Website
with GitHub & Netlify.” November 19, 2023. https://jadeyryan.com/blog/2023-11-19_publish-quarto-website/.